
Installation instructions for the ARP main stud kit, part #150-5801, for the Ford 6.0L Powerstroke diesel. ARP main studs add strength and consistent clamping load to the bottom end. This guide covers thread cleaning, inspection, lubrication and the proper torque sequence.
Download the Original PDF Manual
Application
- Part Number: 150-5801
- Application: Ford 6.0L Powerstroke Diesel
- Inner studs: 5.950 in. long
- Outer studs: 5.475 in. long
IMPORTANT: ARP recommends using the ARP Ultra-Torque Fastener Assembly Lubricant provided with each kit rather than motor oil. Motor oil and other low-quality lubricants cause higher friction on the studs and inconsistent clamping force.
Installation Method
- To ensure proper thread engagement and accurate torque readings, clean ALL threads in the block. Chase the threads if necessary with a thread chaser.
- Clean and inspect all hardware prior to installation. Look for obvious defects or shipping damage, plus proper fit, length and dimension.
- Screw the studs into the block “HAND TIGHT ONLY”. Inner studs are 5.950 in. long; outer studs are 5.475 in. long.
NOTE: Loctite may be used if a permanent mounting of the studs is preferred.
- Install the main caps and check for binding or misalignment.
- Lubricate the stud threads, nuts and both sides of the washers with ARP Ultra-Torque Fastener Assembly Lubricant. Then install the washers and the nuts onto the studs and tighten them hand tight.
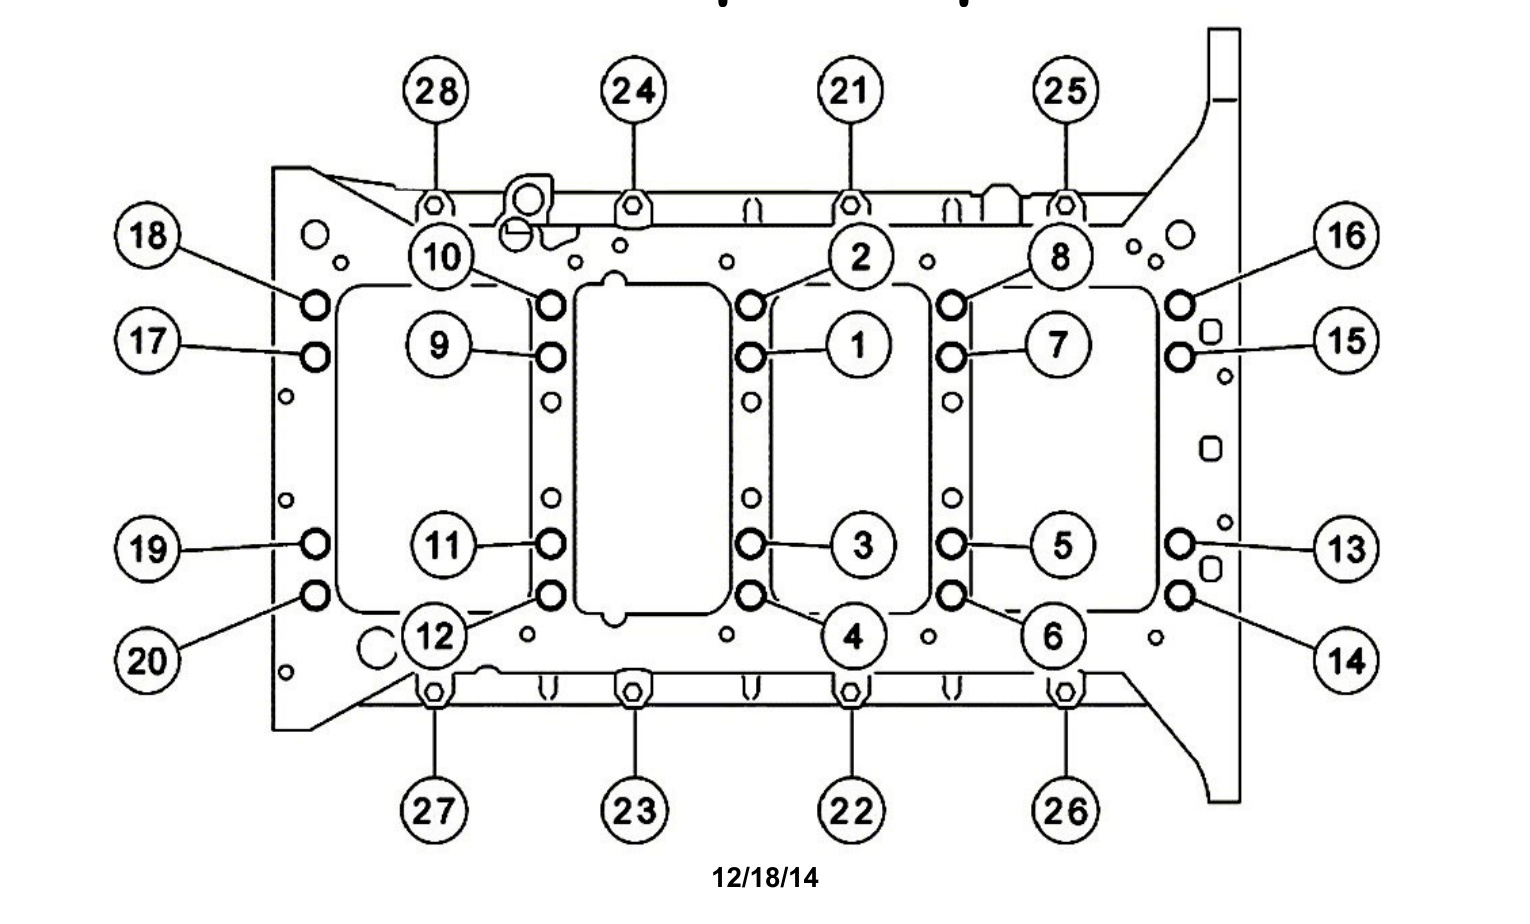
Preload (Torque) Recommendations
Following the manufacturer’s recommended torque sequence (see the diagram below), tighten the nuts and bolts in three equal steps to the specifications listed below, using ARP Ultra-Torque Fastener Assembly Lubricant.
- Step 1: Studs (1–20) — 55 ft-lbs
- Step 2: Studs (1–20) — 110 ft-lbs
- Step 3: Final tighten Studs (1–20) — 170 ft-lbs
- Step 4: M8 Bolts (21–28) — 25 ft-lbs
IMPORTANT — align honing: When changing from factory fasteners to high-strength fasteners, clamping force and tolerances will change. It is therefore necessary to check the main bearing bores for proper size and out-of-round condition after installing the studs, and to align hone the cylinder block if necessary. The main bores should always be align honed using the same fasteners and lubricant that will be installed during final engine assembly, at the recommended preload.