
Installation manual for the BD Killer Dowel Pin (KDP) repair kit for Dodge Cummins 5.9L engines. The kit secures the factory dowel pin before it backs out and damages the timing case. Part #1040182 fits 12-valve (1994-1998) and #1040183 fits 24-valve (1998.5-2002) engines.
Download the Original PDF Manual
IMPORTANT: Read this manual completely before installing this product.
Applications
- 1040182 — Dodge Cummins 5.9L 12 Valve (1994–1998)
- 1040183 — Dodge Cummins 5.9L 24 Valve (1998½–2002)
Kit Contents
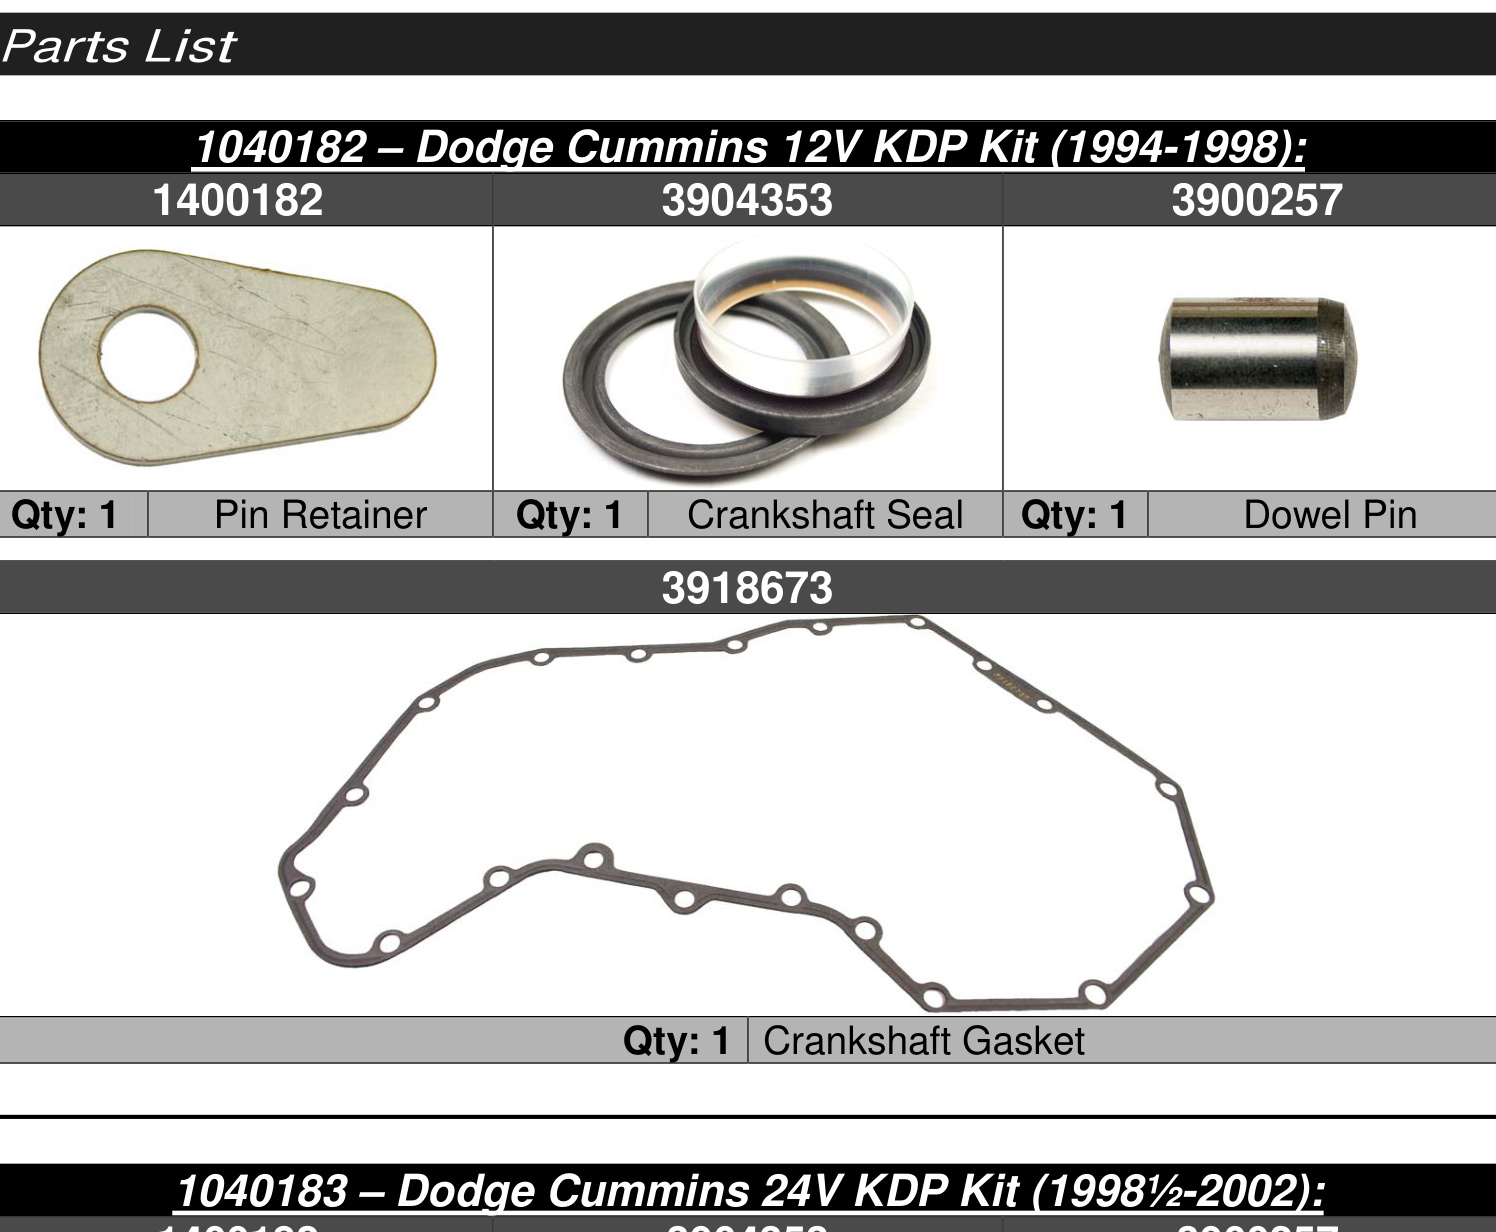
1040182 — Dodge Cummins 12V KDP Kit (1994–1998)
- Qty 1 — Pin Retainer (part #1400182)
- Qty 1 — Crankshaft Seal (part #3904353)
- Qty 1 — Dowel Pin (part #3900257)
- Qty 1 — Crankshaft (timing cover) Gasket (part #3918673)
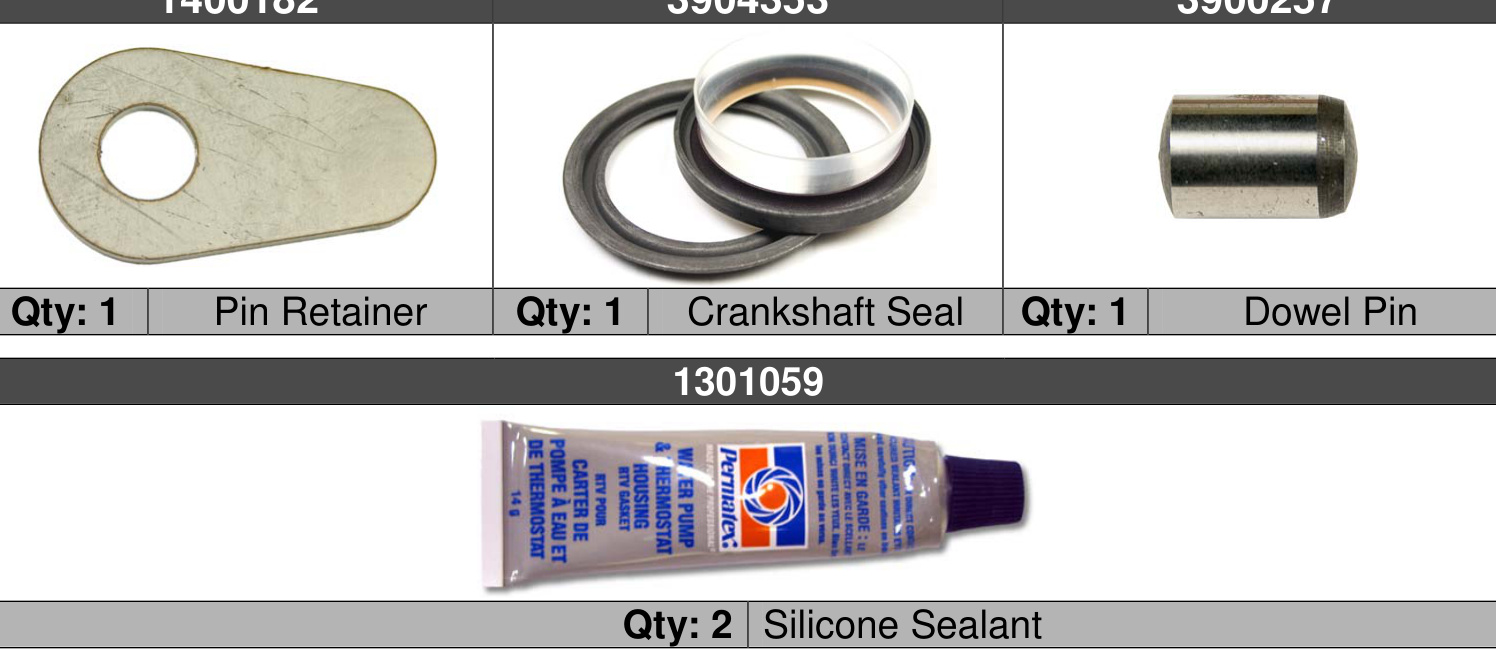
1040183 — Dodge Cummins 24V KDP Kit (1998½–2002)
- Qty 1 — Pin Retainer (part #1400182)
- Qty 1 — Crankshaft Seal (part #3904353)
- Qty 1 — Dowel Pin (part #3900257)
- Qty 2 — Silicone Sealant (part #1301059)
Torque Specifications
- Gear cover / timing cover bolts — 24 N·m (18 lbs-ft)
- Oil fill tube mounting bolts — 43 N·m (32 lbs-ft)
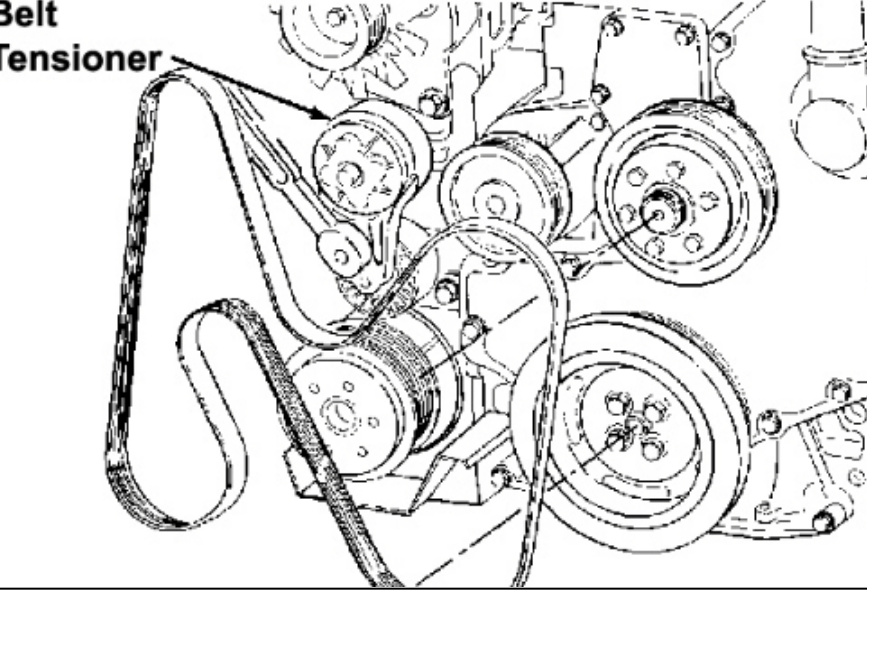
- Belt tensioner mounting bolts — 43 N·m (32 lbs-ft)
- Vibration damper bolts — 125 N·m (92 lbs-ft)
Removal — Crankshaft Front Seal
- Remove the fan drive assembly.
- Remove the fan belt and the belt tensioner.
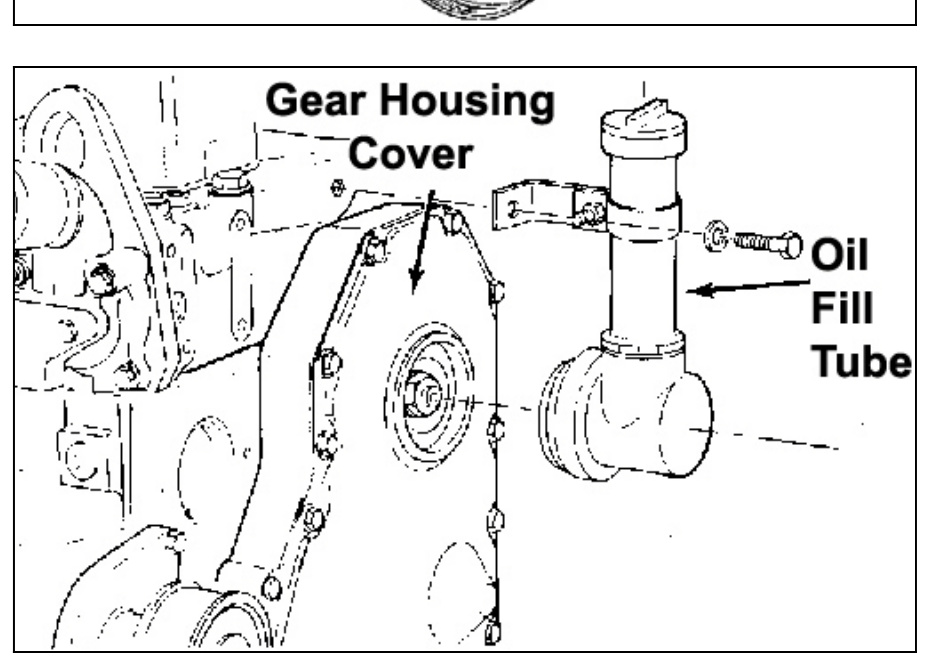
- Remove the oil fill tube and adapter.

- Remove the vibration damper.
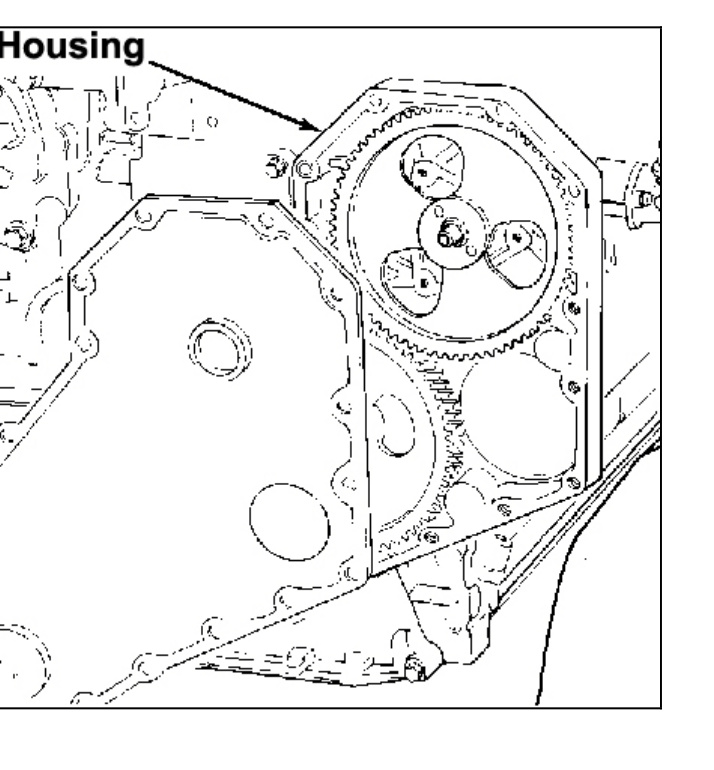
- Remove the bolts that hold the gear cover to the gear housing.
- Gently pry the cover away from the housing, taking care not to mar the gasket surfaces.
- Clean the old gasket residue from the back of the gear cover and the front of the gear housing.
Installation
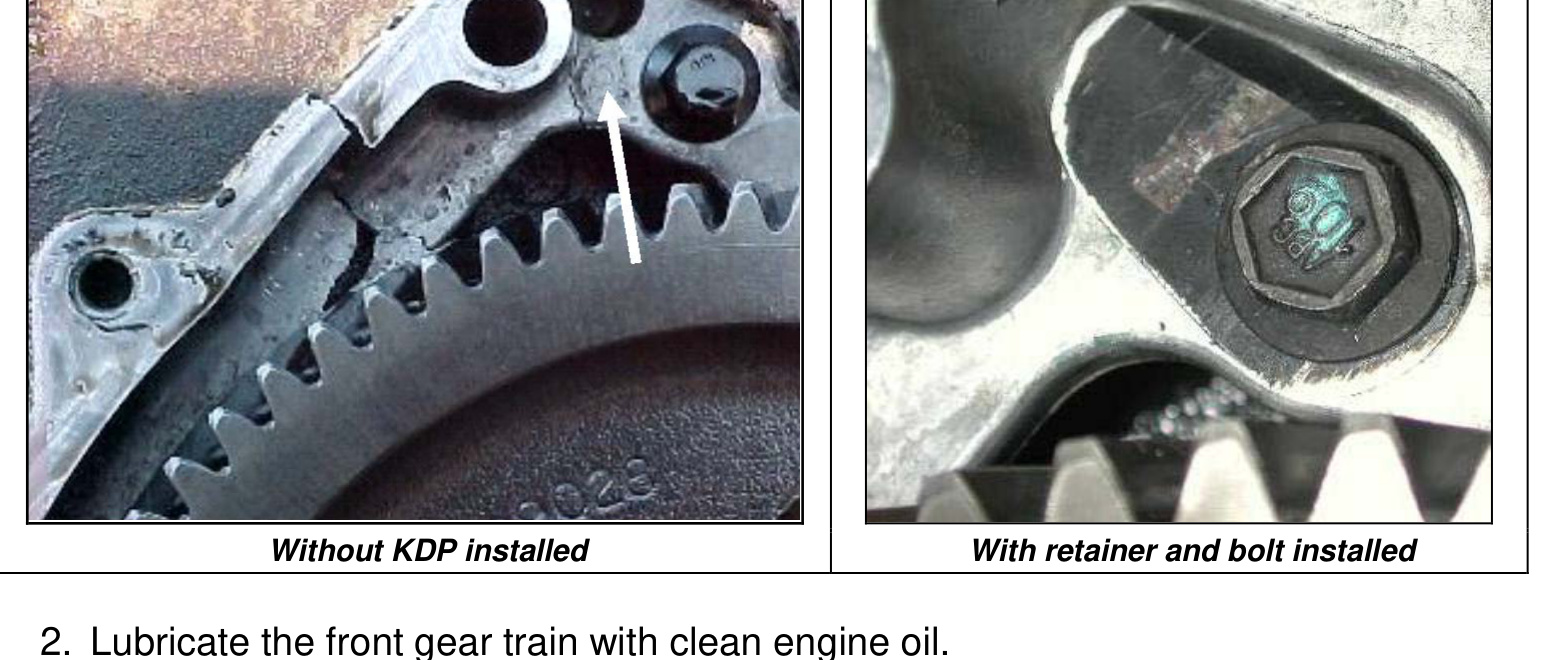
- Knock the KDP (killer dowel pin) back into place and install the tab (pin retainer) under the adjacent bolt. If the KDP is missing, install the spare one provided in the kit.
- Lubricate the front gear train with clean engine oil.
- Thoroughly clean the front seal area of the crankshaft. The seal lip and the sealing surface on the crankshaft must be free from any oil residue to prevent seal leaks.
Crankshaft Front Seal
- Install the seal into the front cover using a plastic hammer and the install tool (the metal ring that comes in the seal box). Place the tool so that the groove on it is pushing the seal down into the cover. This will set the seal in slightly further than the original; this is so the new seal is not riding on the groove left in the crank by the old seal. Hit the alignment/installation tool alternately at the 12, 3, 6 and 9 o’clock positions to drive the seal in evenly. Sometimes it helps to file a slight chamfer on the edge of the seal bore in the timing cover to get the seal started.
NOTE: The plastic install sleeve must remain in the seal during this process. Removing & reinstalling it could damage the seal.
- Reinstall the timing cover with the new gasket, using the nylon sleeve to guide the seal over the end of the crank and over the groove from the old seal.
- Install the cover bolts. The bolts should be snugged first, then torqued evenly to 24 N·m (18 lbs-ft). If sealer is being used, snug the bolts then leave for 20–30 min to allow the sealer to cure, and then torque. Once this is done, remove the nylon sleeve.
- A rubber dust shield is supplied with the front seal. This is a new Cummins item and does not fit every truck — some cranks are too small or too large to accept it. The dust shield is a tight fit on the crank and must be installed carefully. Slide the dust shield over the end of the crank with the concave (dished) side facing the seal. The shield will tend to flatten out when the damper is bolted on — this is normal.
- Install the oil fill tube and mounting bolts. Tighten the bolts to 43 N·m (32 lbs-ft) of torque.
- Install the vibration damper. DO NOT torque the bolts at this time.
- Install the belt tensioner. Tighten the mounting bolts to 43 N·m (32 lbs-ft) of torque.
- Raise the belt tensioner to install the belt.
- Tighten the vibration damper bolts to 125 N·m (92 lbs-ft) of torque. Use an engine barring tool to keep the engine from rotating during the tightening operation.
- Install the fan drive assembly.
Questions?
If you have any technical comments, questions, or problems with this kit, please call the BD Diesel technical hotline at (800) 887-5030, Monday to Friday, 8:30am to 5:30pm Pacific Standard Time (PST).