
Owner's and setup guide for the Bully Dog Triple Dog GT Diesel tuner, part #40420. This document covers the basic installation steps, tuning information, gauge functions and California emissions notes. For the product overview and quick-start install, see our GT 40420 overview page.
Download the Original PDF Manual

The 49-state legal GT Diesel (part #40420) is not legal for sale or use in California on pollution-controlled vehicles. If your vehicle is registered in California, you must use the 50-state legal GT Diesel, part #40425.
Preview of Basic Installation Steps
- Update the GT. This step is very important — see the Updating the GT section below.
- Physically install the GT (OBDII adapter plug, power wire, HDMI cable and mount).
- Install the tune to your vehicle.
IMPORTANT: You MUST uninstall your Bully Dog engine tune (return to stock) before taking your vehicle in for ANY type of service. There are also other important times to uninstall the tune — see the Uninstalling / Returning to Stock section below.
California Emissions Regulations
- The 49-state legal GT Diesel (part #40420) is not legal for use on emissions-regulated vehicles registered in California. Installing it on a California-registered vehicle can result in state penalties.
- If your vehicle is registered in California, use the 50-state legal GT Diesel, part #40425.
- An Executive Order (EO) is issued by the California ARB to signify that a vehicle tune has been emissions tested and is legal for on-road use. If your application has received an EO number, the EO label should be included in the package. To check which Bully Dog applications have an EO number, visit bullydog.com/carb_info.php.
Tuning Information
The results below are typical — variations do occur between vehicles. Some vehicles do not have the Extreme power level setting available, or On-The-Fly horsepower adjustability.
- Extreme: up to 120+ peak horsepower / up to 250+ peak torque
- Performance: 75+ peak horsepower / 125+ peak torque
- Tow / Economy: 50+ peak horsepower / 100+ peak torque
- Stock Power: stock horsepower / stock torque
Vehicle Applications
This application list is current for GT software version 1.13.8. Check the GT product page at bullydog.com for the newest applications.
Chevrolet / GMC
- Express / Savana, Kodiak / Topkick, Sierra / Silverado — 6.6L 2001–2015
Dodge / RAM
- RAM 2500–3500 — 5.9L 2003–2007, 6.7L 2007–2015
- RAM 4500–5500 — 5.9L 2003–2007, 6.7L 2007–2015
Ford
- Excursion — 7.3L 1999–2003, 6.0L 2003–2006
- F-250–550 — 7.3L 1999–2003, 6.0L 2003–2007, 6.4L 2008–2010, 6.7L 2011–2015 (no '13–'15 cab & chassis)
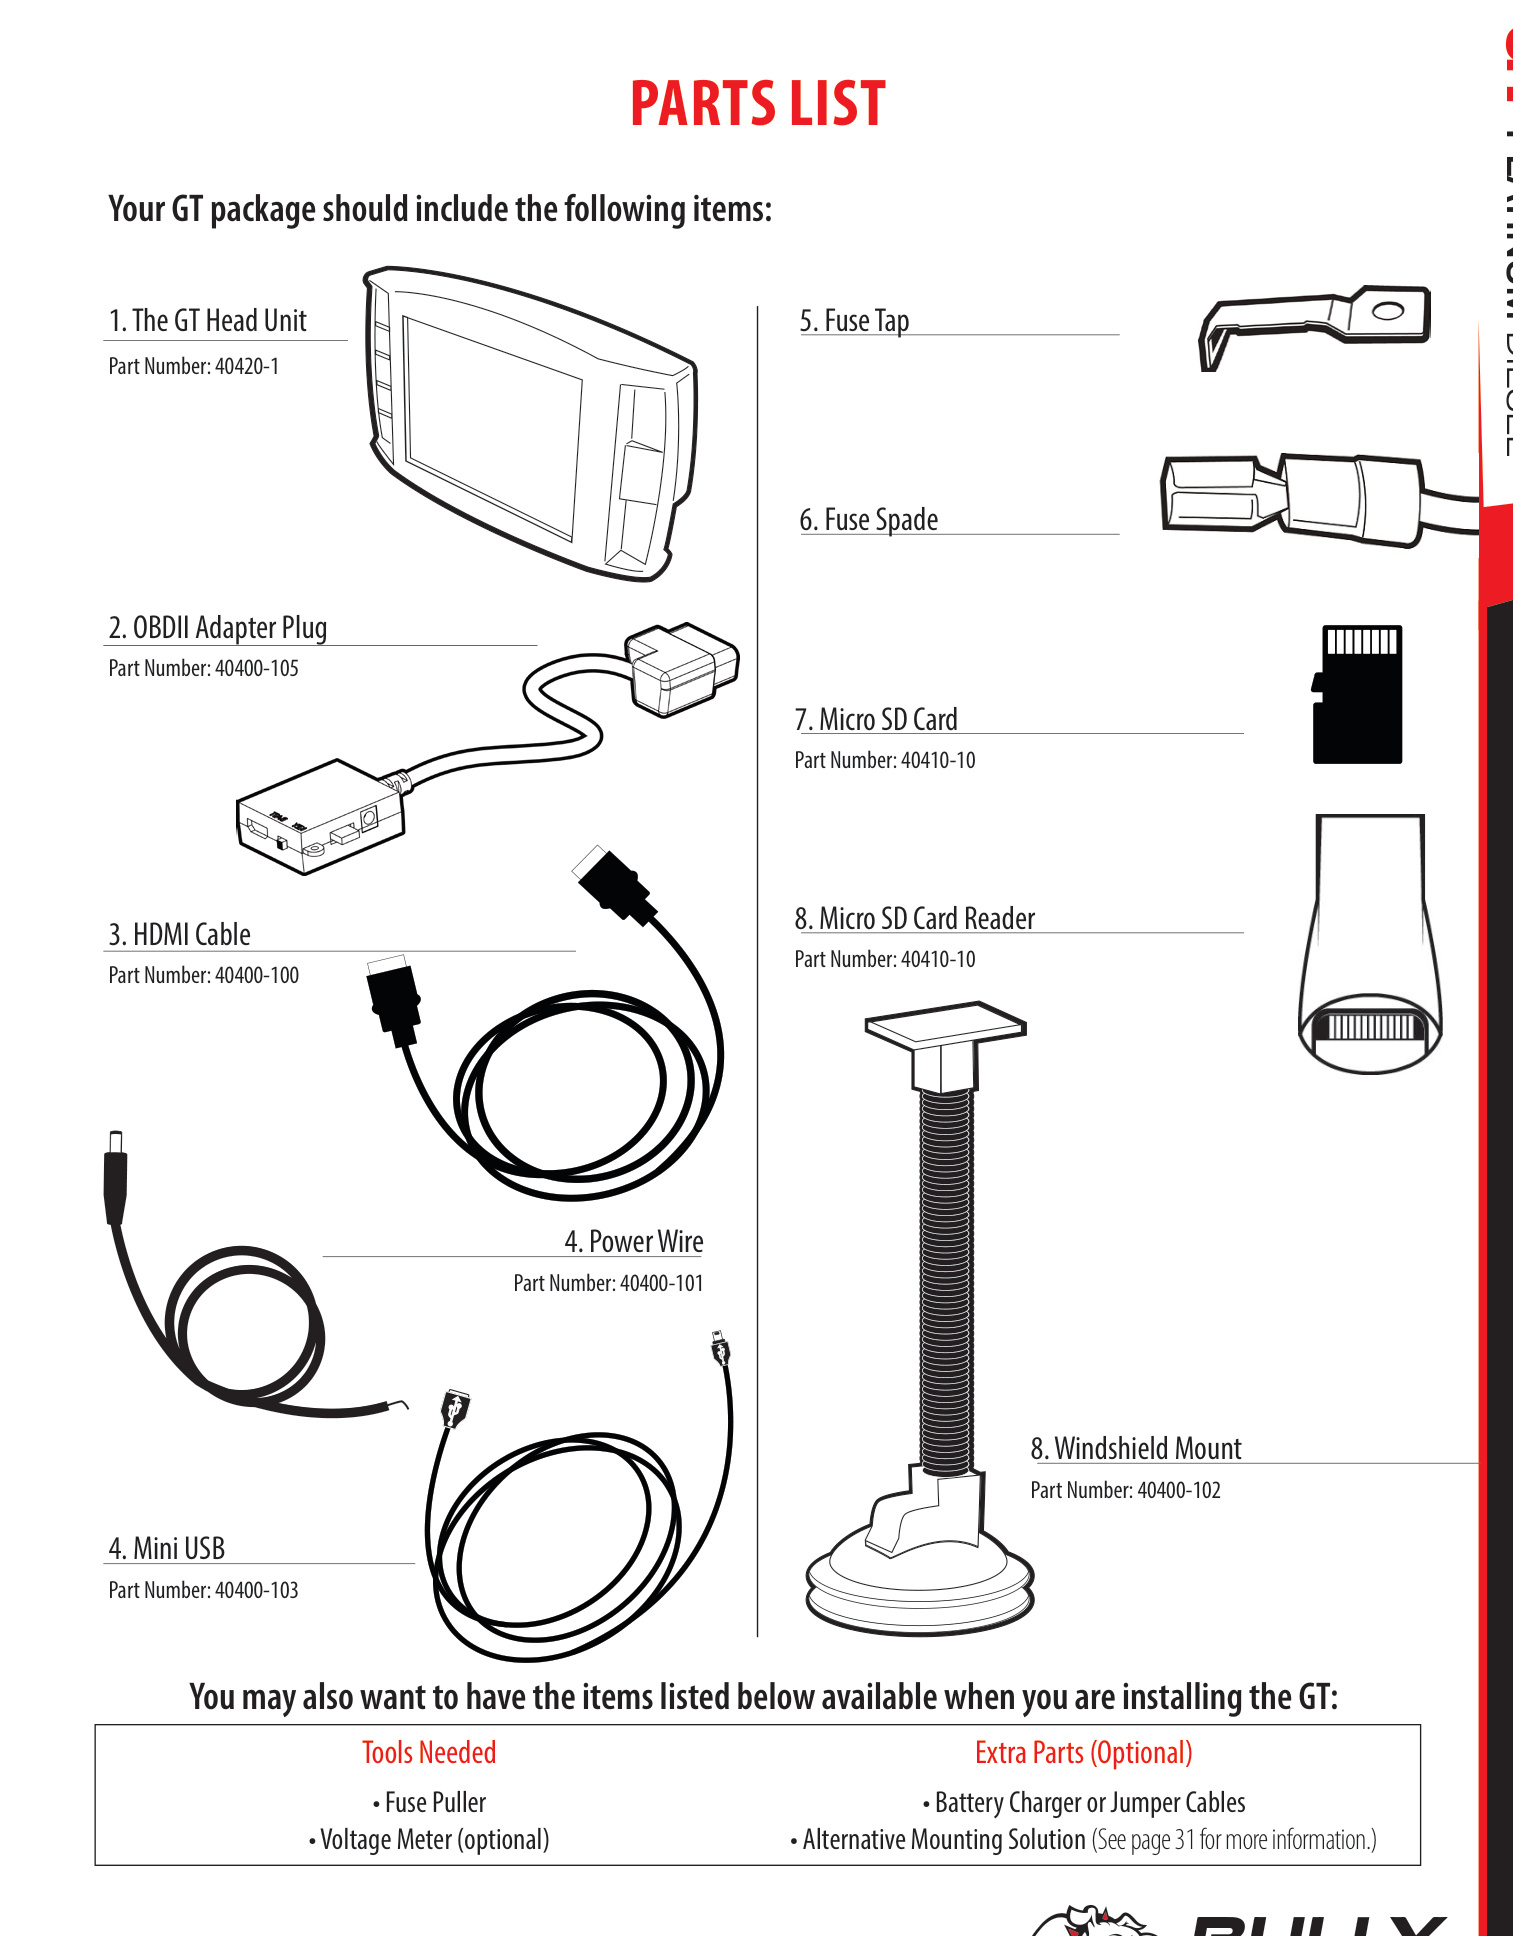
Kit Contents
Your GT package should include the following items:
- GT Head Unit (part #40420-1)
- OBDII Adapter Plug (part #40400-105)
- HDMI Cable (part #40400-100)
- Power Wire (part #40400-101)
- Mini USB Cable (part #40400-103)
- Fuse Tap
- Fuse Spade
- Micro SD Card (part #40410-10)
- Micro SD Card Reader (part #40410-10)
- Windshield Mount (part #40400-102)
Tools Needed
- Fuse Puller
- Voltage Meter (optional)
Optional Extra Parts
- Battery Charger or Jumper Cables
- Alternative Mounting Solution (see Additional Mounting Options below)
Parts Description
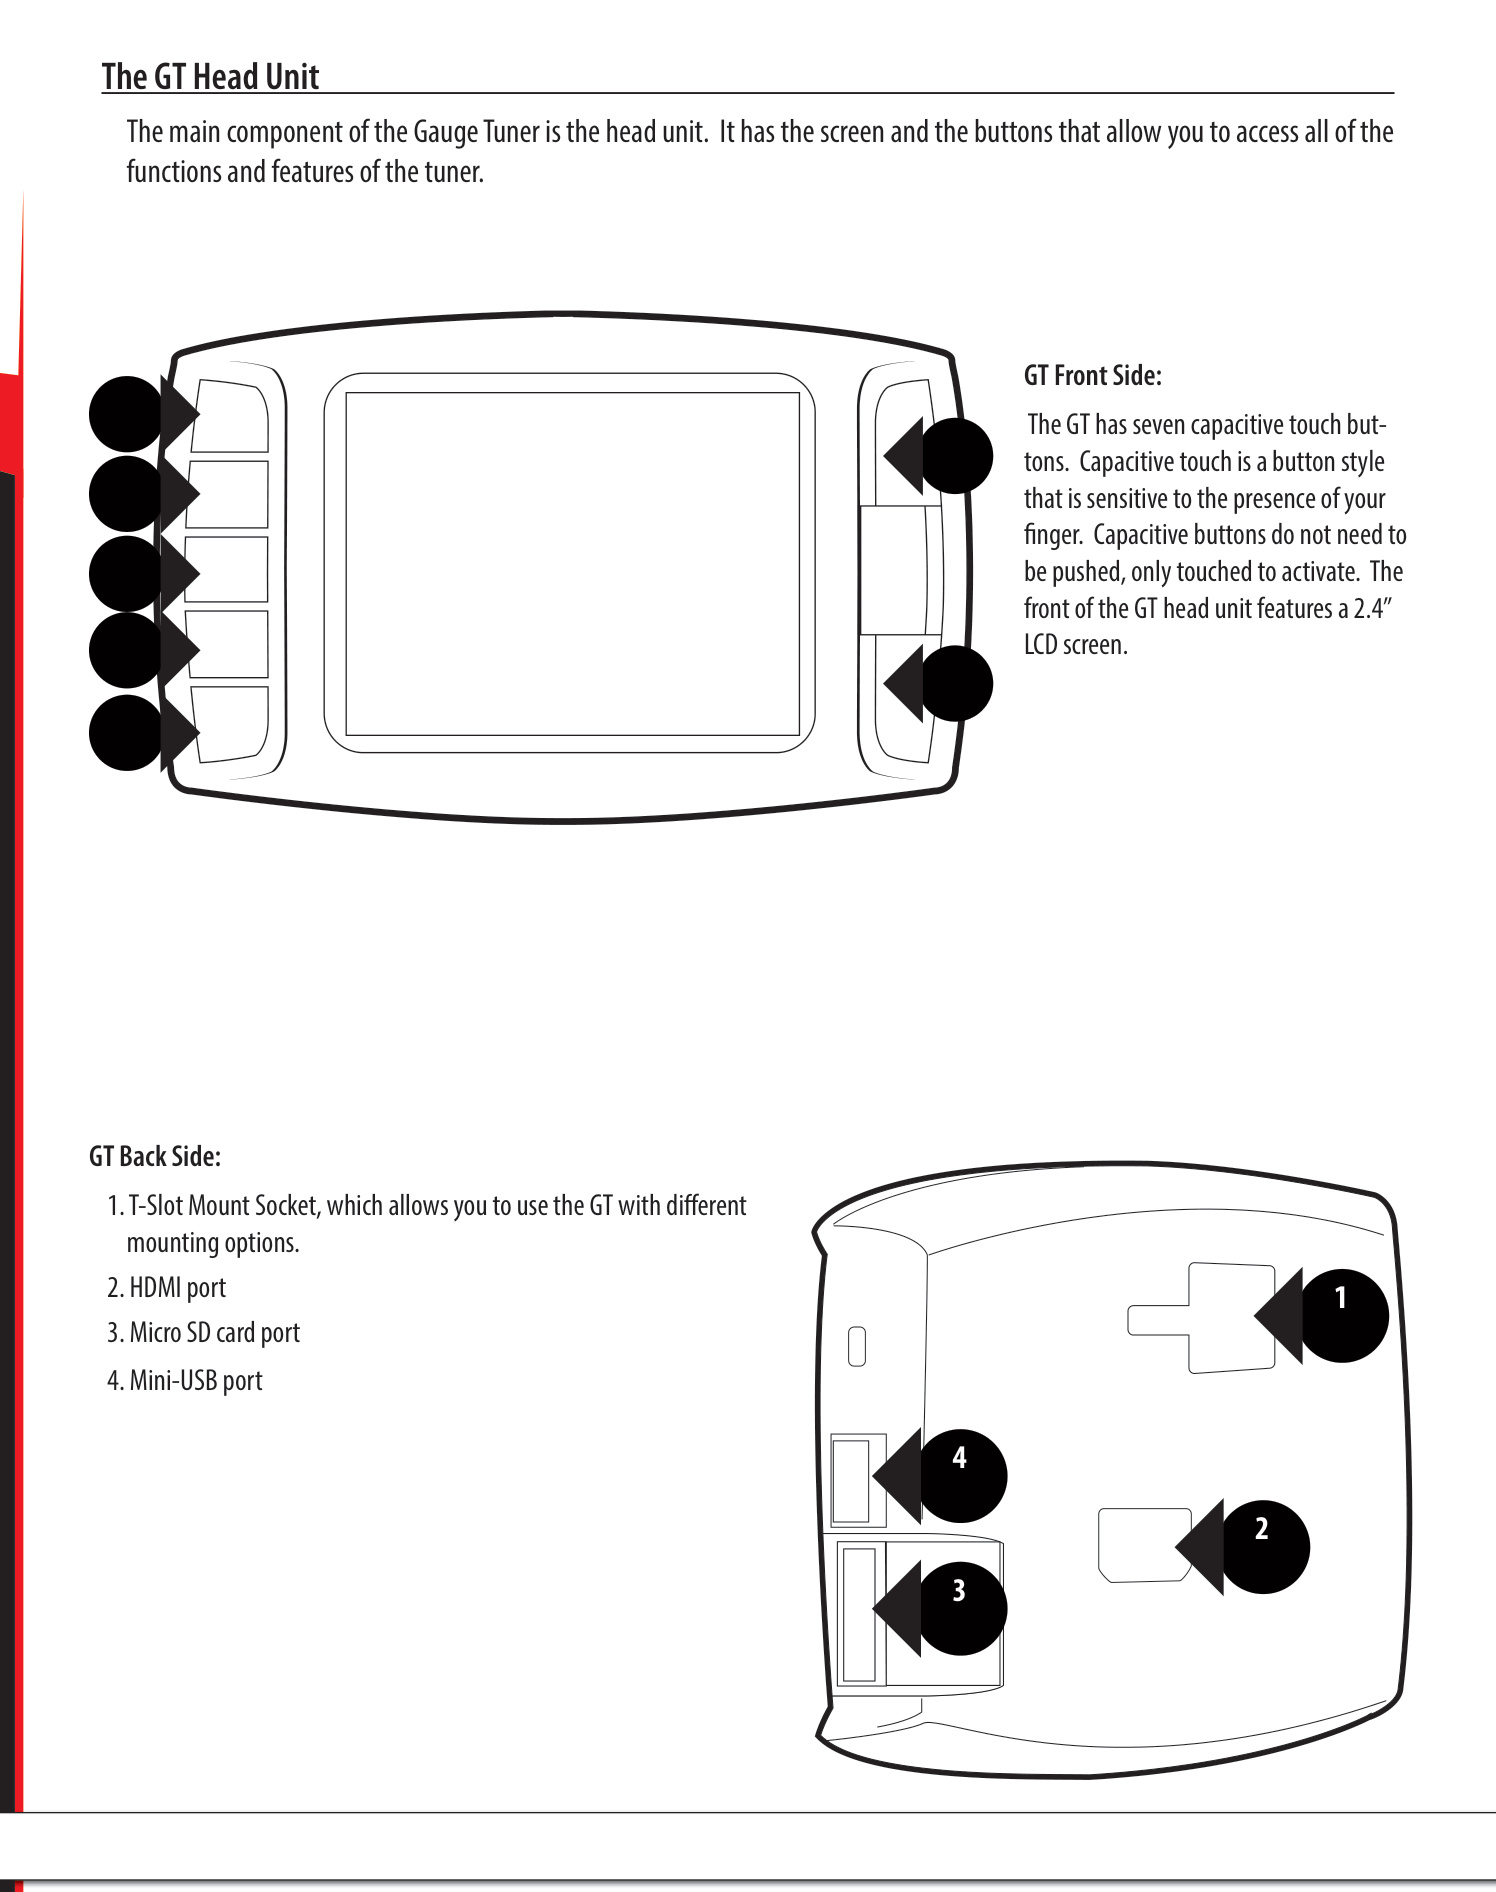
The GT Head Unit
The main component of the Gauge Tuner is the head unit. It has the screen and the buttons that let you access all of the functions and features of the tuner.
- Front side: The GT has seven capacitive touch buttons. Capacitive touch is a button style that is sensitive to the presence of your finger — the buttons do not need to be pushed, only touched to activate. The front features a 2.4″ LCD screen.
- Back side: (1) T-Slot mount socket, which lets you use the GT with different mounting options; (2) HDMI port; (3) Micro SD card port; (4) Mini-USB port.
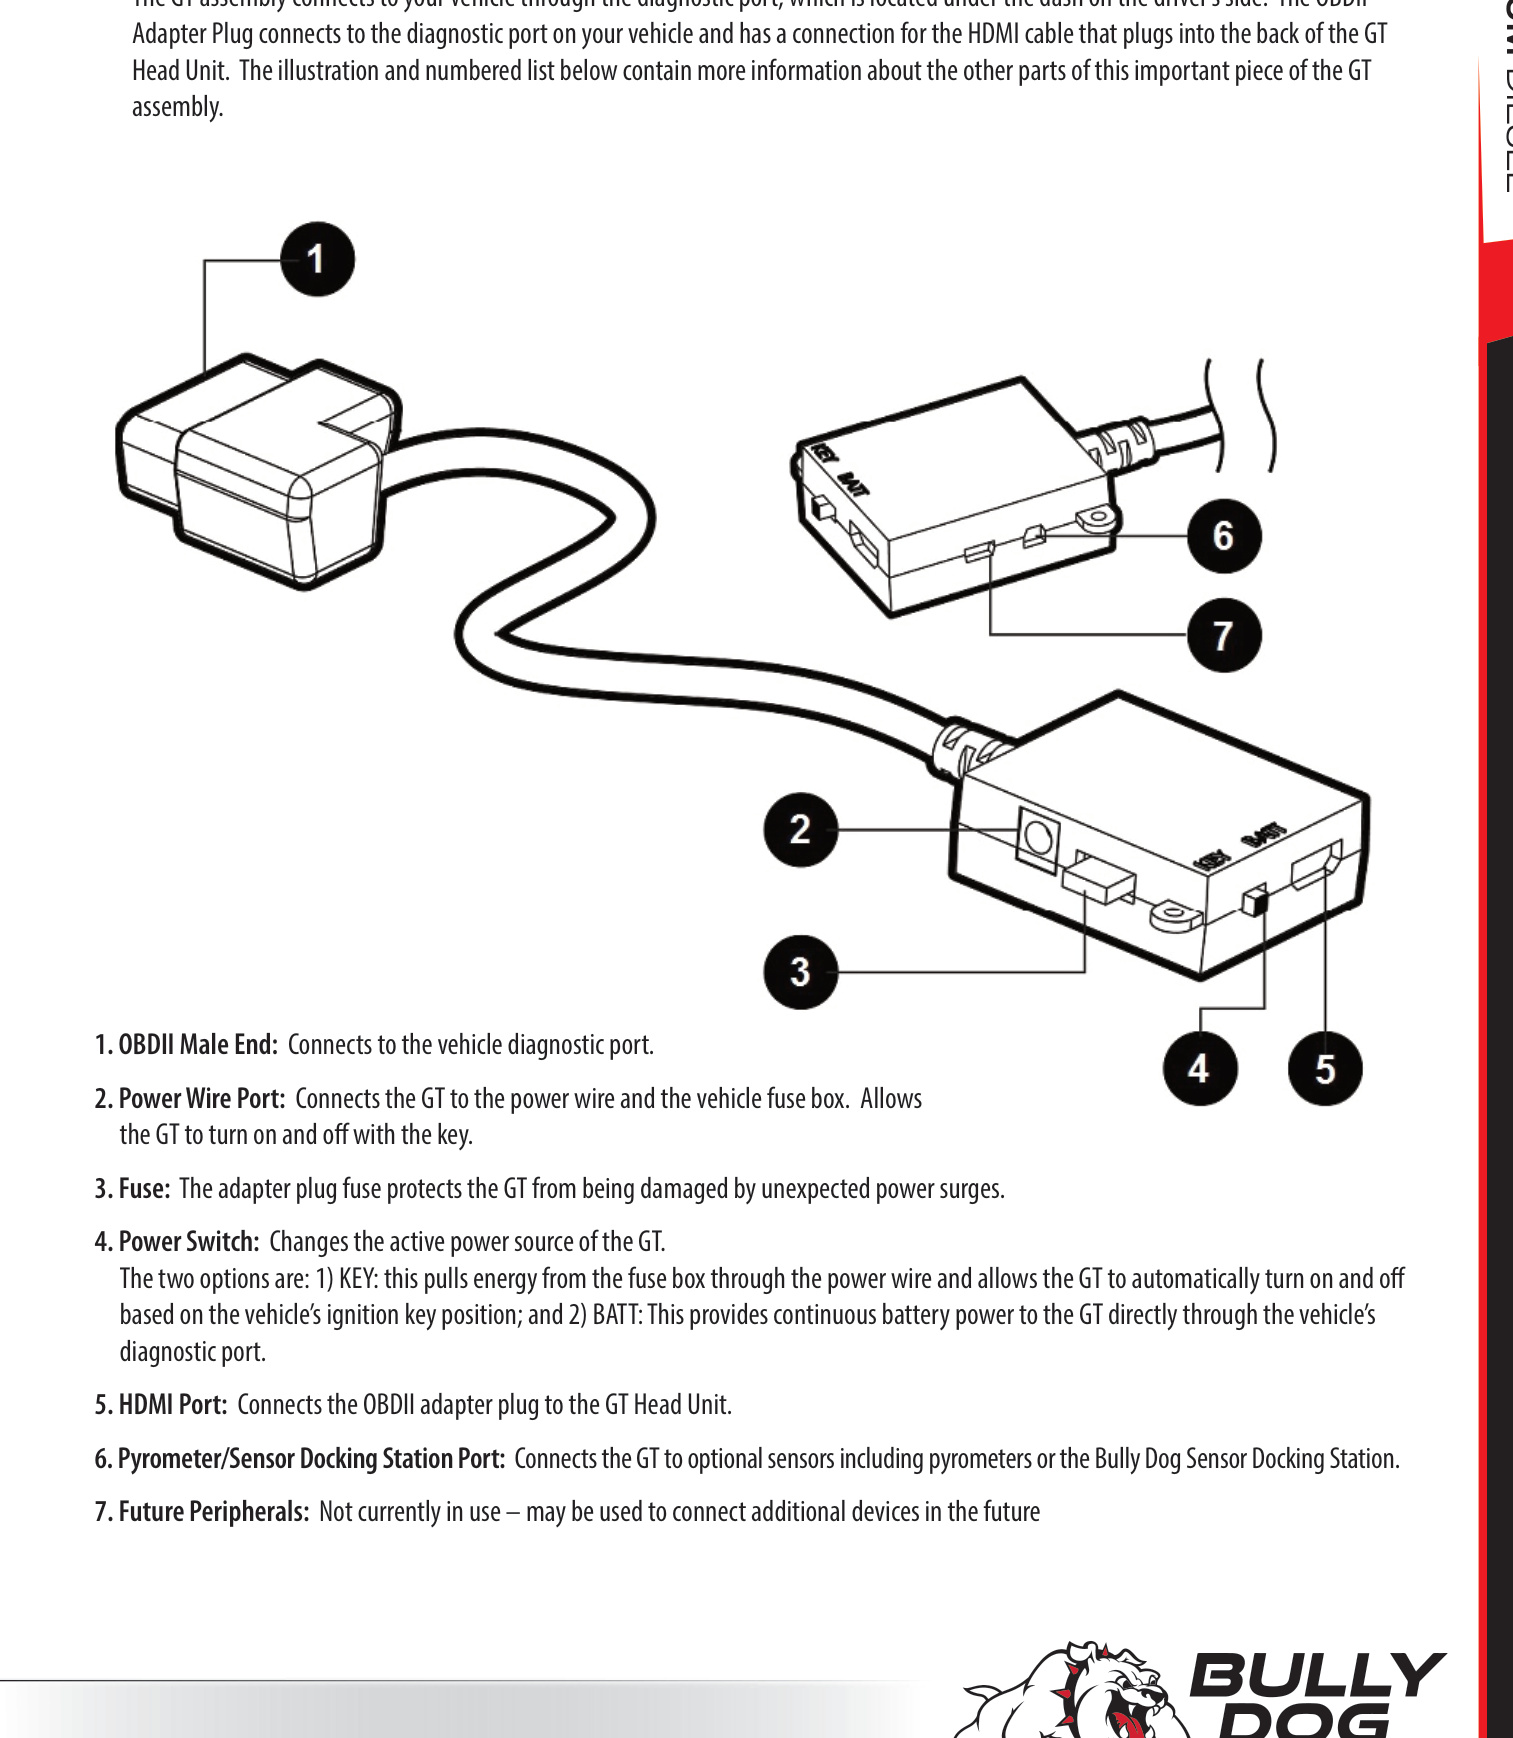
The OBDII Adapter Plug
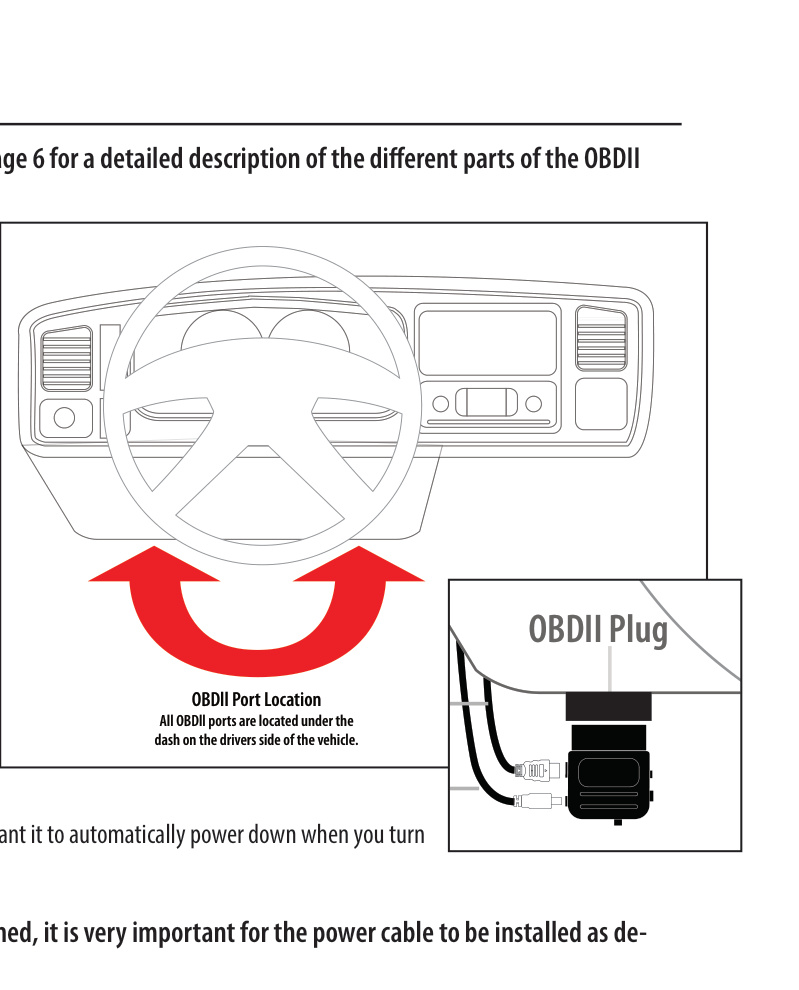
The GT assembly connects to your vehicle through the diagnostic port, which is located under the dash on the driver's side. The OBDII Adapter Plug connects to that port and provides the connection for the HDMI cable that plugs into the back of the GT Head Unit.
- OBDII Male End: Connects to the vehicle diagnostic port.
- Power Wire Port: Connects the GT to the power wire and the vehicle fuse box. Allows the GT to turn on and off with the key.
- Fuse: Protects the GT from being damaged by unexpected power surges.
- Power Switch: Changes the active power source of the GT. The two options are — KEY: pulls energy from the fuse box through the power wire and lets the GT turn on and off automatically with the ignition key; and BATT: provides continuous battery power to the GT directly through the diagnostic port.
- HDMI Port: Connects the OBDII adapter plug to the GT Head Unit.
- Pyrometer / Sensor Docking Station Port: Connects the GT to optional sensors including pyrometers or the Bully Dog Sensor Docking Station.
- Future Peripherals: Not currently in use — may be used to connect additional devices in the future.
Step 1: Update the GT
Always update the GT before installing the tune — even a brand-new unit. There is no way to know how long your GT sat on a shelf, and vehicle manufacturers regularly change the part numbers the GT needs to communicate with your engine computer. Updating also delivers tested fixes and any newly unlocked vehicles or features. Check for updates at least four times a year (about once every three months), and any time you have uninstalled the tune.
NOTE: Do not try to use the HDMI cable or the OBDII adapter plug to update the GT. Use the micro SD card reader or a USB cable as described below.
What You Need to Update
- A computer with internet access (Windows is most convenient; see the Apple steps below if needed).
- A way to connect the micro SD card to the computer — either the included card reader, OR a USB cable connecting the GT (with the micro SD card installed).
Basic Update Steps
- Run the Update Agent application.
- Connect the micro SD card to your computer.
- Choose your vehicle application and let the Agent search.
- Click the Update button and let it write the update to the SD card.
- When the update is finished, put the micro SD card in the GT.
- Turn the GT on (connect it to a computer or vehicle and turn the key to the Run position), then choose Update Firmware from the Main Menu.
Detailed Steps (Windows)
- If the tune is currently installed, uninstall it first (return to stock).
- Connect your micro SD card to a computer with internet access — using the card reader, OR by connecting the GT with the card installed via a USB cable.
- Download and install the Update Agent application from bullydog.com/update_agent.php. (If it is already installed, it will be listed under the Bully Dog Technologies folder in your All Programs list.)
- Run the Update Agent. If it is already running, right-click its icon in the system tray and choose Show Agent.
- Choose the correct application for your vehicle and click Select Vehicle Application.
- Let the Update Agent search and download the available update files.
- Click the Update button and let it write the update to the SD card.
- Move the SD card to the GT (or, if the GT is connected by USB, press the second key from the top on the left side to exit USB mode, or unplug it and connect it to the vehicle). Turn the key to the Run position.
- On the GT, go to the Main Menu and choose Update GT Software. (If that option is not shown, choose Update GT Firmware, or scroll to the top and choose Change Vehicle and select your vehicle.)
- Confirm that you want to load the file, then let the GT load it and reboot. Do not disconnect or power off the GT during this step. The GT is now updated.
Detailed Steps (Apple / Mac)
- Return your vehicle to stock (uninstall the tune) if the tune is installed.
- Connect your micro SD card to your computer using the card reader, OR connect the GT with the card installed via USB (do not use the HDMI cable).
- Go to bullydog.com and click the link for Update Agent.
- At the bottom of the page, under MACINTOSH USERS ONLY, click the GT Diesel link to download the zipped file GTDFiles.zip.
- Extract all the files from GTDFiles.zip (usually in your Downloads folder).
- Select ALL contents within the "COPY" folder and drag them to the SD card. Choose "Copy & Replace" (or "Replace All").
- Install the micro SD card in your GT and connect the GT to your vehicle.
- Choose Update GT Software from the Main Menu. (If unavailable, choose Update GT Firmware, or use Change Vehicle.)
- Confirm and let the GT load the file and reboot — do not interrupt power. The GT is now updated.
Troubleshooting Updating Problems
- The Update Agent won't install (opens a window of strange symbols): Your computer is not up to date. Run Windows Update first, then try again.
- The Update Agent won't recognize the micro SD card: The SD card is missing an important file (GTDIDF.bin). On the Bully Dog website, open the Update Agent page, click the GT Diesel card file link, then copy the downloaded file to your SD card. (Your computer probably can't open the file — that's fine, just copy it.) Restart the Update Agent and it should recognize the card.
Step 2: Physical Installation
Quick overview of the basic steps (detailed instructions follow):
- Connect the OBDII adapter plug to the port under the dash.
- Plug the power cable into the fuse box and connect it to the adapter plug.
- Run the HDMI cable under the dash.
- Mount and connect the GT.
Connect the OBDII Adapter Plug
Find the OBDII port in your vehicle. The exact location varies between vehicles, but it is always somewhere under the driver's-side dash, and it will have the same shape as the end of the adapter plug. Once located, simply connect the adapter plug to it.
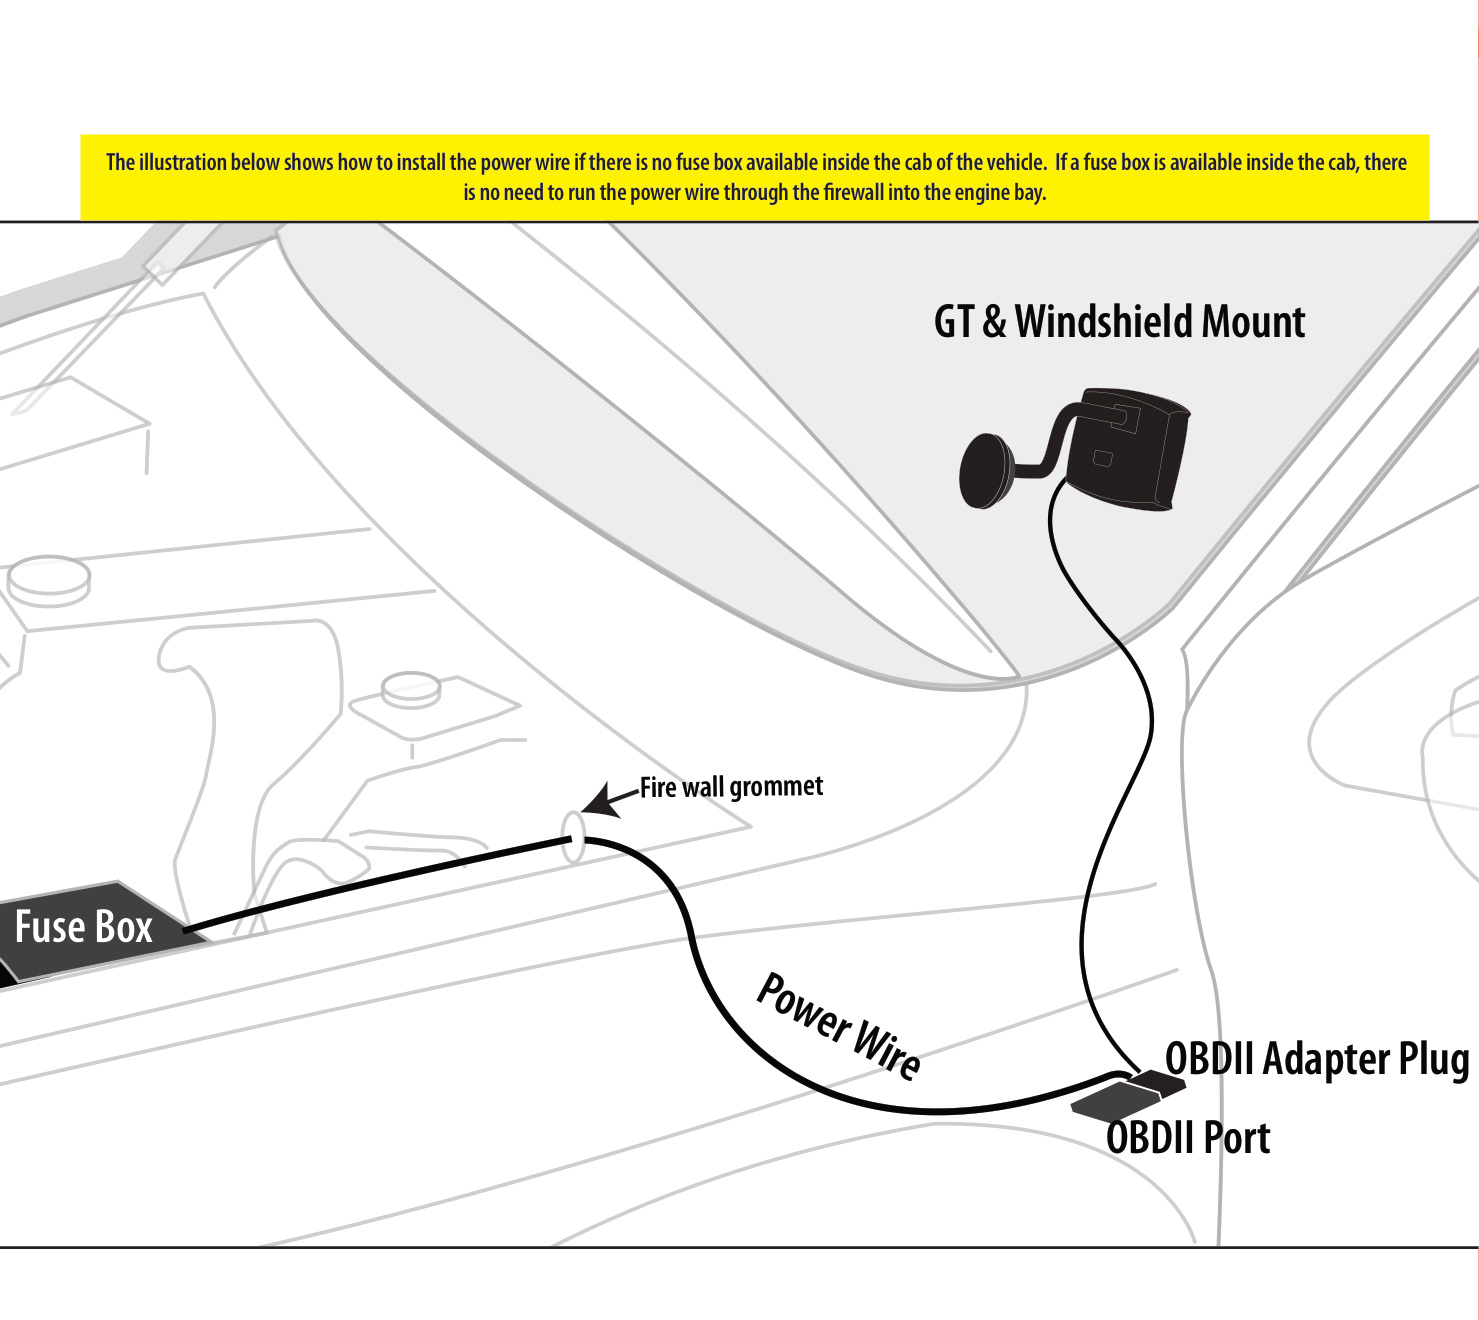
Connect the Power Cable
For the GT to work as designed (turning on and off with the key), install the power cable as described below. The cable is only optional if you plan to disconnect the GT when not in use, want it powered at all times, or prefer to switch it on and off manually.
- Locate an ignition ("key-on") fuse — one that is controlled by the position of the key and turns off when the key is off. The front windshield wiper fuse is usually a good choice. Every vehicle is different; check your owner's manual or look up the fuse layout online.
- Connect the power cable to the fuse, using the included fuse tap (see below), or simply place the power cable into the fuse box alongside the existing fuse.
If your vehicle does not have a fuse box inside the cab, run the power cable through the firewall to the fuse box under the hood (see the overview illustration above).
Using the Fuse Tap and Spade
- Find and pull the fuse you are going to use for the GT power cable.
- Slip the fuse tap over the prong on the fuse.
- Fit the spade over the fuse tap and crimp them together with pliers.
- Put the tapped fuse back into the fuse box.
Run the HDMI Cable
- Plug one end of the HDMI cable into the port on the OBDII adapter plug.
- Run the middle of the cable up through the dash on the driver's side so the end comes out near the A-pillar. It may be necessary to temporarily remove the weather stripping and dash panel to hide the cable.
- Leave enough slack to connect the GT once it is in the mount.
Connect and Mount the GT
IMPORTANT: Safety is your first concern when placing the GT. Make sure it does not create blind spots or distract the driver.
- Install the mount you have chosen. If using the included Universal Windshield Mount, follow the steps below.
- Connect the HDMI cable to the GT.
- Secure the GT to the mount.
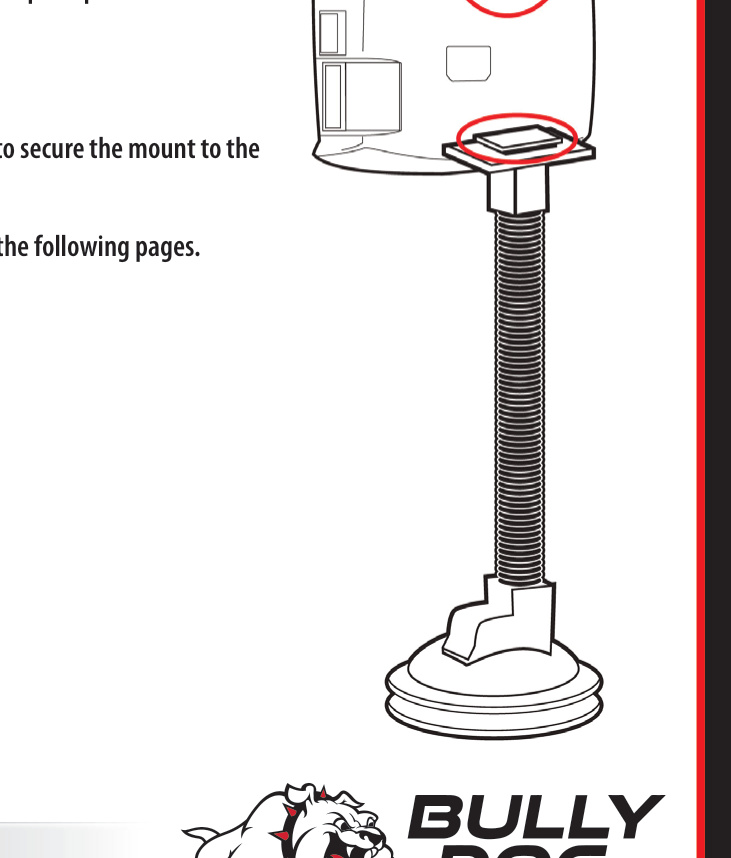
Using the Universal Windshield Mount
- Locate the T-shaped socket on the back of the GT.
- Place the square top of the Universal Windshield Mount into the square part of the T-shaped socket.
- Slide to the left to secure the GT to the mount.
- Place the suction cup against the windshield and use the lever to secure the mount.
Additional Mounting Options
- RAM Mirror-Mate (part #31600 and #33600): Mounts the GT directly beneath your rearview mirror for easy access without blocking the driver's view.
- RAM Suction Cup Mounting Kit (part #30600): A high-holding-power suction mount that works on multiple surface materials so you can try different positions.
- Pillar Mount Gauge Pods: Vehicle-specific pods that mount the GT on the A-pillar. Choose the part number that matches your vehicle make and year.
Step 3: Install the Tune
CAUTION: This step actively reprograms the engine computer in your vehicle. If the process is interrupted because of poor preparation, you could have problems that prevent you from using the GT — or even from driving your vehicle — for a few days. Review the preparation steps carefully before beginning.
Important Preparation Steps
Choose an appropriate time and place.
- Do NOT install if you'll need the vehicle soon — set aside at least an hour (a smooth install can take under 30 minutes, but troubleshooting needs time).
- Do NOT install in a remote location. Make sure you have access to a phone and a computer with internet access.
- Update the GT online (with the Update Agent) before you install.
- Make sure you can contact Bully Dog technical support (open Monday–Friday, 7 a.m.–6 p.m. Mountain Time) before you begin.
Manage other electronics.
- Turn off all factory electronics: headlights, heater, air conditioning, stereo, DVD players, etc.
- Disconnect any chargers or devices plugged into cigarette lighters, USB ports or other outlets.
- Disconnect any aftermarket electronics (trailer brakes, stereo, alarm, CB, remote start, satellite radio, etc.) from power. You don't have to fully remove them — just make sure they aren't getting power.
Make sure the battery is charged. Fully charge the battery before beginning, and have a battery charger ready in case it begins to lose charge during the install.
Make sure the tuner is ready. Complete an online update with the Update Agent, then confirm the tune is not already installed: go to the Main Menu → Show Settings → check the Status.
- Not Installed: You can continue.
- Installed: Connect the GT to the original vehicle and uninstall the tune first. If that isn't possible, contact technical support for a reset (a mandatory fee applies).
- Recovery: Contact technical support for assistance.
IMPORTANT: It is very important that the tuner is not interrupted while it is writing to your engine computer. If the battery dies and the tune is interrupted, it could prevent you from starting your vehicle and possibly require the ECM to be replaced.
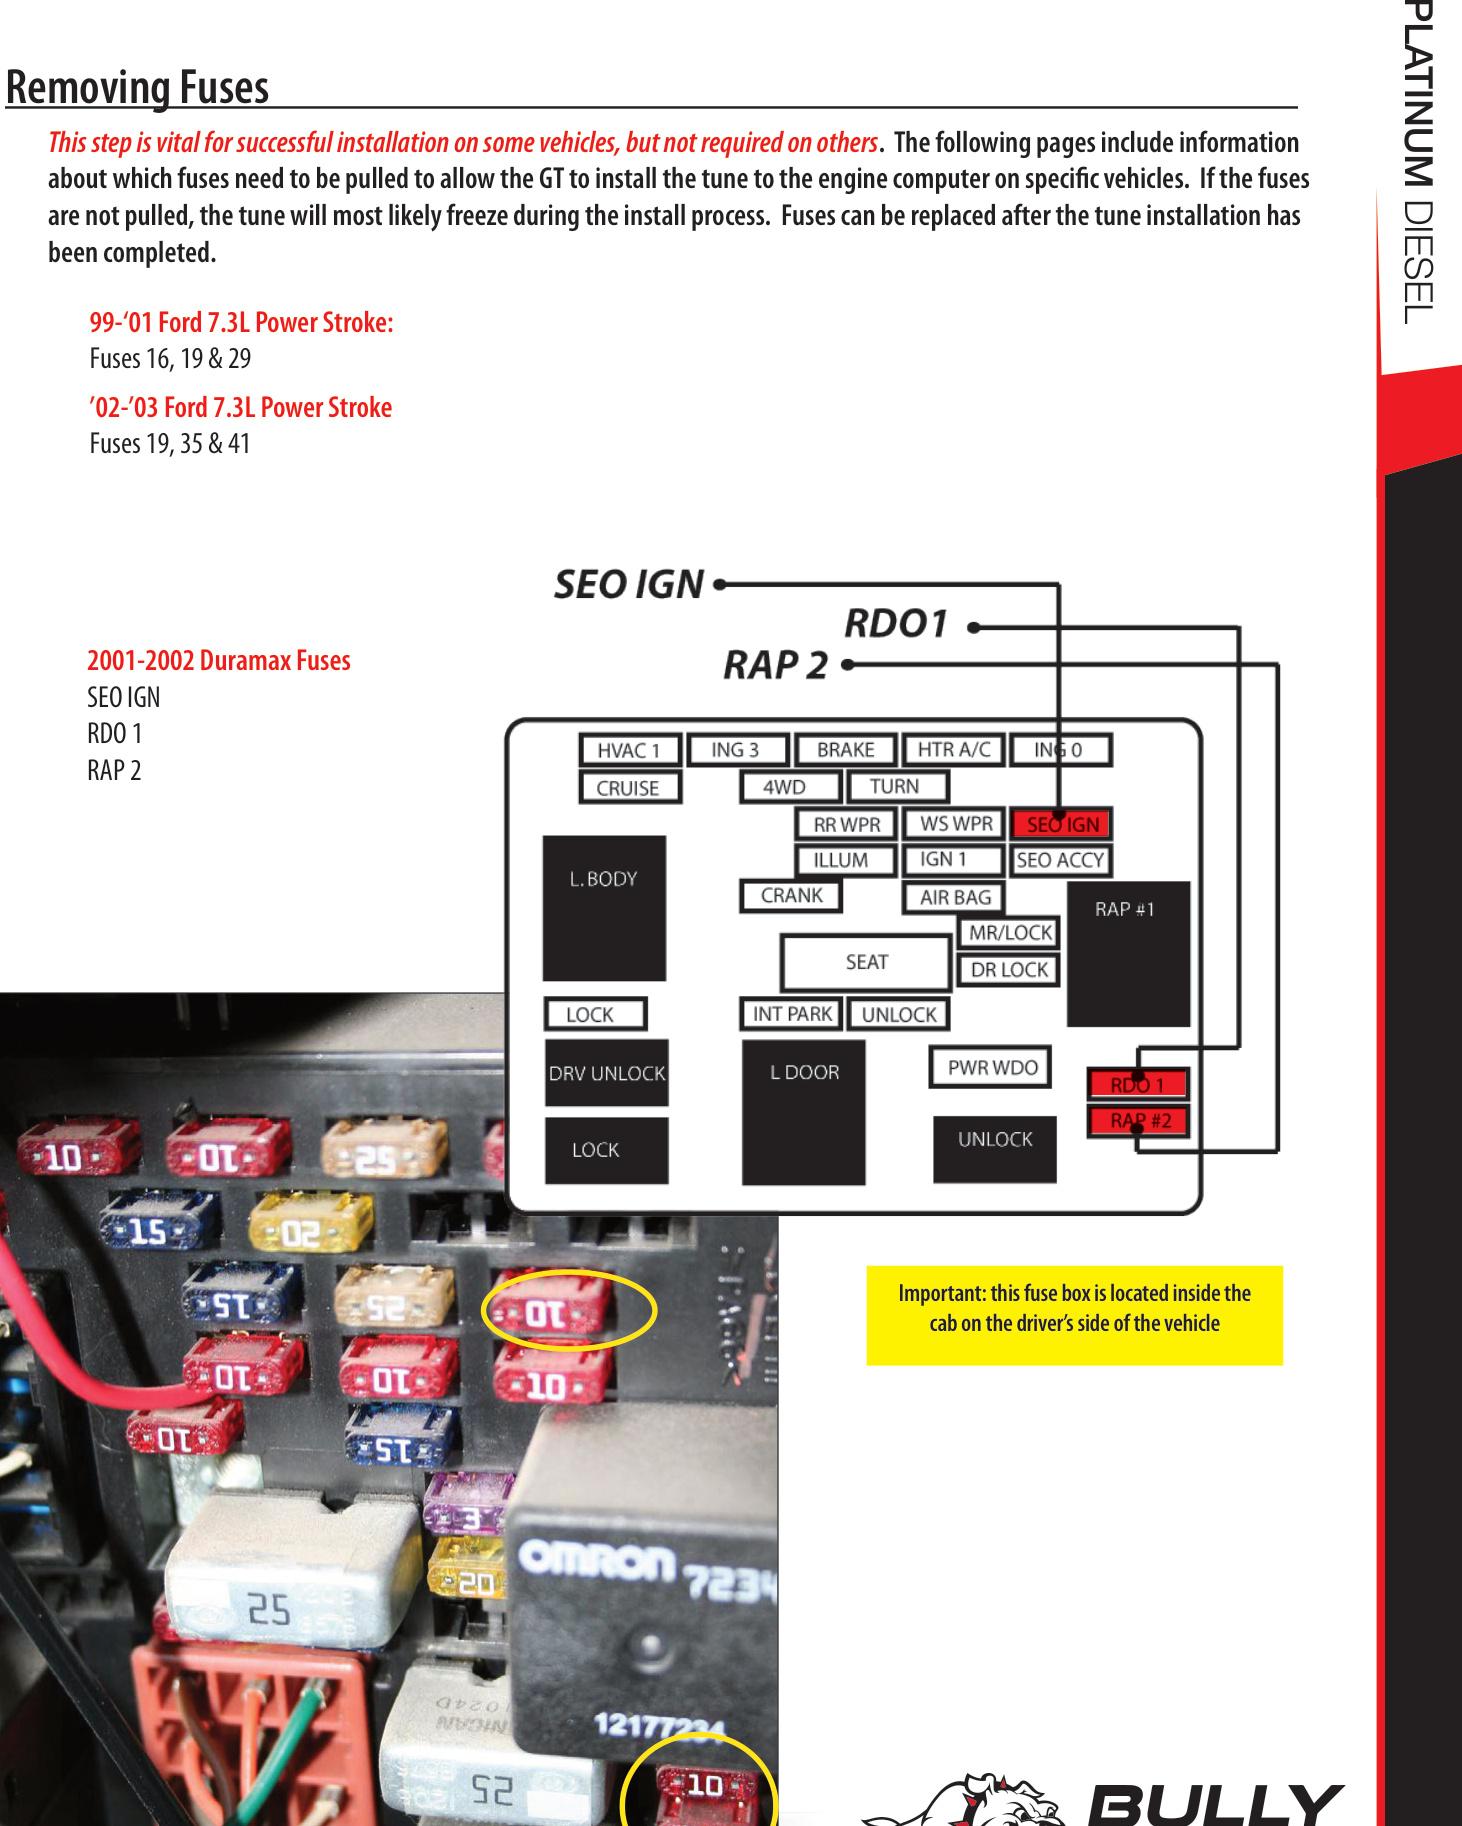
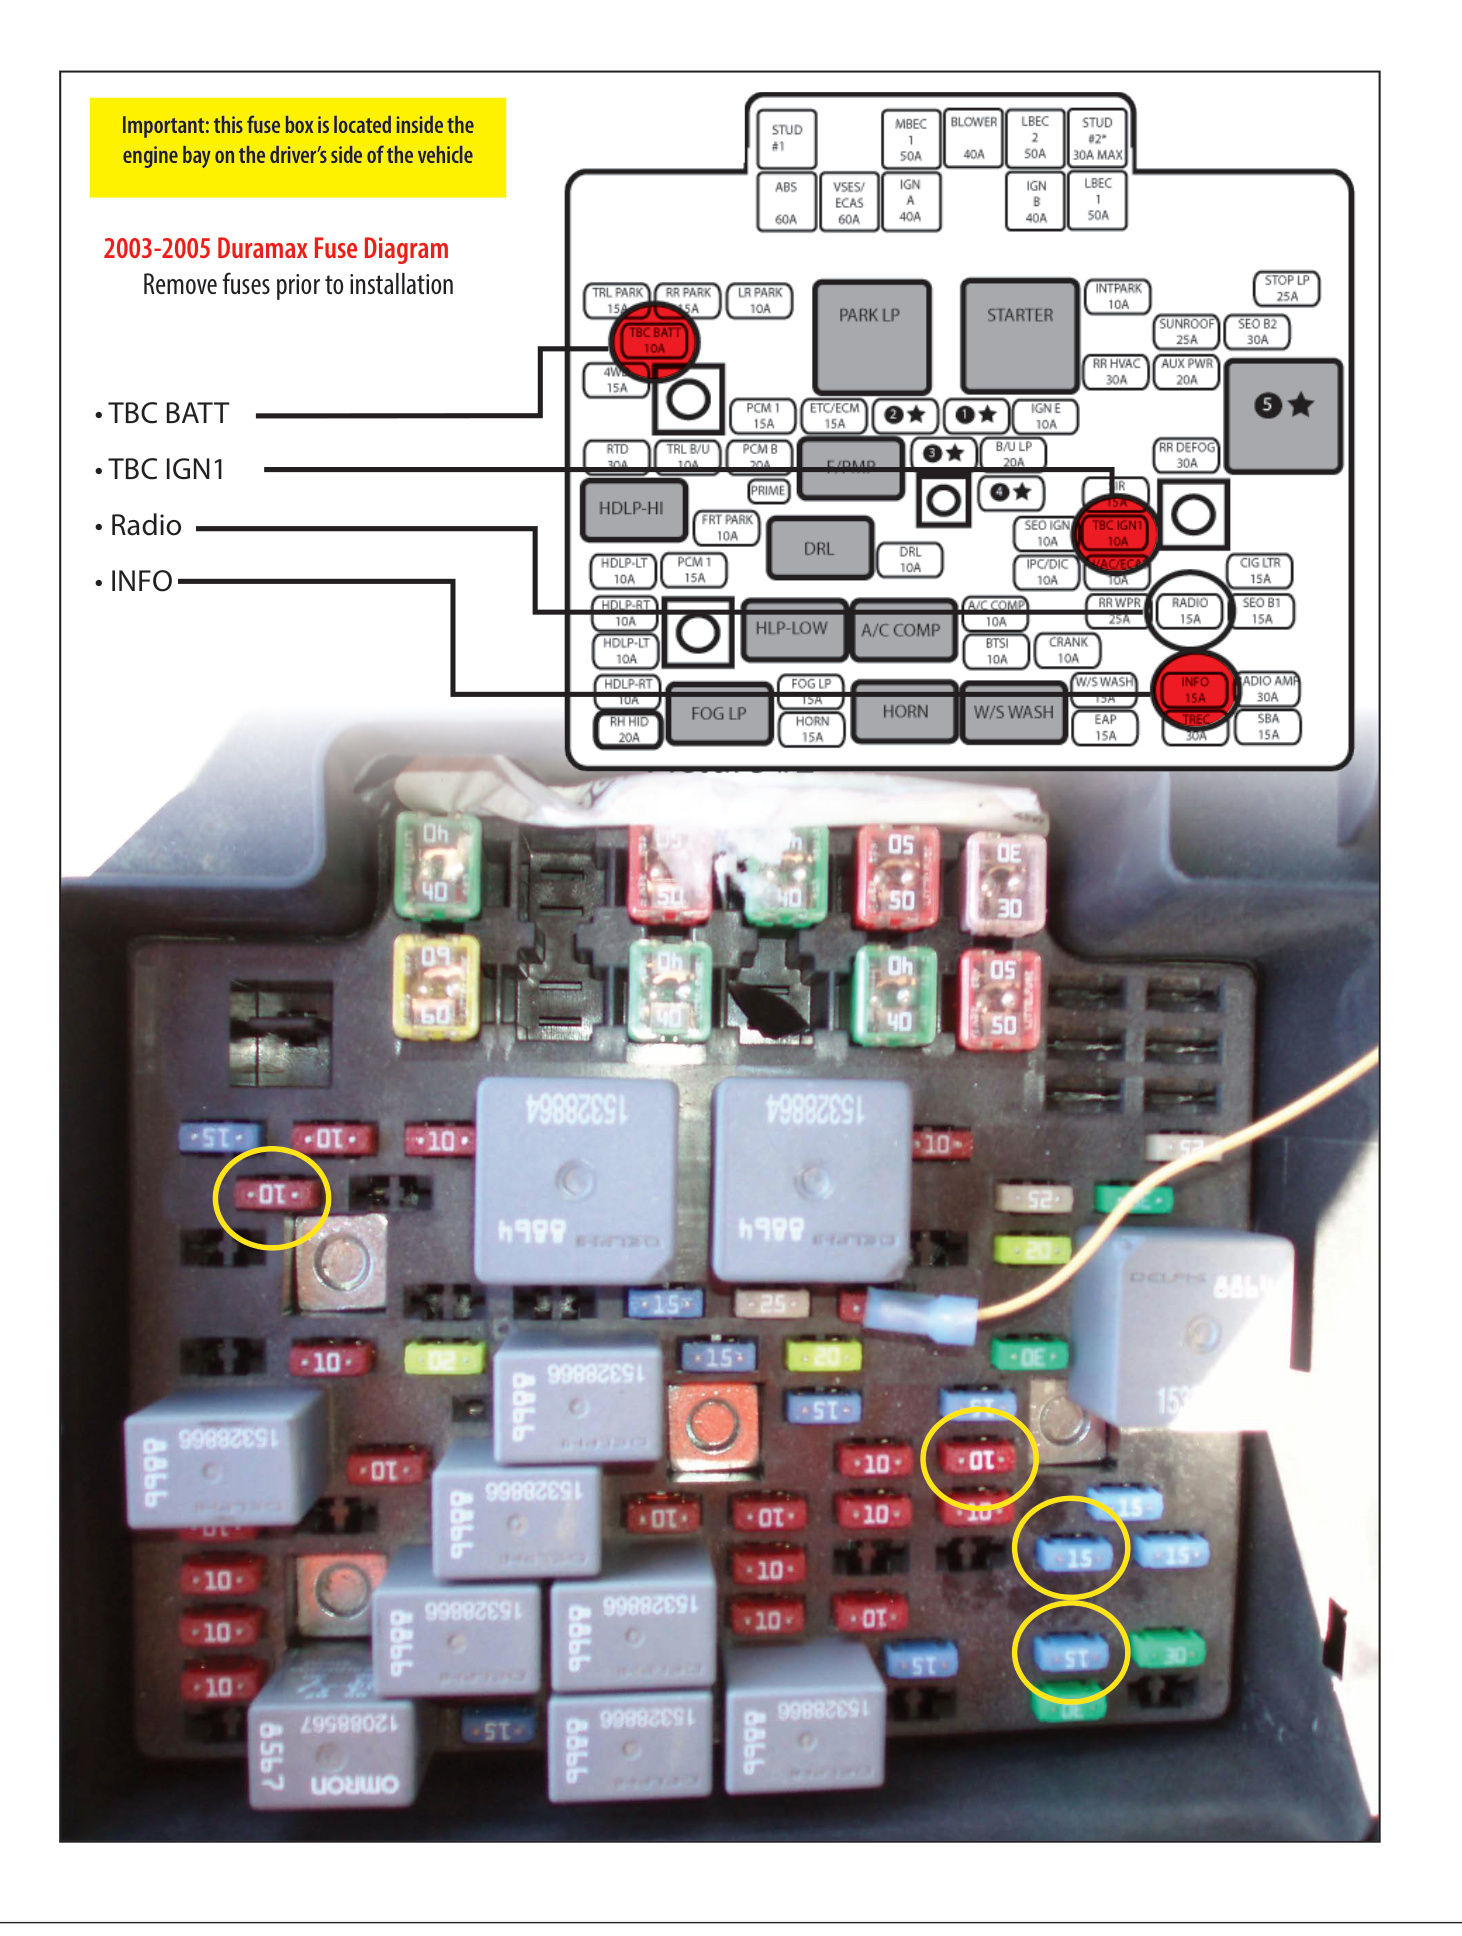
Removing Fuses (Some Vehicles)
On some vehicles, pulling specific fuses is vital for a successful install — if they are not pulled, the tune will most likely freeze during the install. Fuses can be replaced after the install is complete.
- '99–'01 Ford 7.3L Power Stroke: Fuses 16, 19 & 29
- '02–'03 Ford 7.3L Power Stroke: Fuses 19, 35 & 41
- 2001–2002 Duramax: SEO, IGN, RDO 1, RAP 2 (fuse box located inside the cab on the driver's side)
- 2003–2005 Duramax: TBC BATT, TBC IGN1, Radio, INFO (fuse box located in the engine bay on the driver's side)
How to Install the Tune
- Complete the pre-install steps: update the GT, finish the physical installation, and complete all the preparation steps above.
- Turn your key to the Run position. Do NOT start the engine.
- Go to the Main Menu.
- Choose Install Download.
- Follow the on-screen instructions, which will prompt you to turn the key to different positions and press Continue. Do NOT start the engine at any point during the install. You may be prompted to choose settings such as the speed limiter (many are vehicle specific). If an error message appears, do not change anything — contact technical support immediately.
- The GT will indicate when it is finished and then reboot to the Main Gauge Display. Once it has rebooted, you can start and use your vehicle normally.
WARNING: There are certain times during the install when disconnecting or interrupting power to the GT can corrupt the engine computer programming. This can cause your vehicle not to start and possibly require the ECM to be replaced. When the screen shows "Writing Engine — Do Not Unplug," it is vital that power is not disturbed.
Troubleshooting Installation Problems
Error during installation (including codes 0, 141, 325 on a 2011 Duramax, 358, 393):
- Note the code number and all information shown on the screen.
- Disconnect and update your GT.
- Make sure all aftermarket electronics are disconnected and all preparation steps are complete.
- Try the install again. If the error returns, contact technical support.
Gets stuck on "Turn Key to Run":
- Make sure the key is turned as far as possible without starting the engine.
- Turn the key Off, then back On; jiggle the key if needed.
- Disconnect the GT, update it if you haven't, then reconnect.
- Make sure all aftermarket electronics are disconnected, and pull fuses if required for your vehicle.
- Try connecting a battery charger to maintain voltage (this solves many problems, even with a new, fully charged battery), then install again.
GT freezes mid-download: Try connecting a battery charger to maintain voltage.
Uninstalling — Returning to Stock
"Uninstalling the tune" and "returning to stock" mean the same thing: writing the original factory settings back to the engine computer and signaling the GT that it is no longer installed, which lets you reinstall the tune later. The GT will not allow you to install if the tune is already installed on a vehicle.
IMPORTANT: If you do not return your vehicle to stock when needed, you may have to call technical support to have the GT reset — a mandatory fee applies.
When to Return to Stock
- Every time you take your vehicle in for any type of service. The engine computer is commonly "flashed" (reprogrammed) during service, even routine maintenance, which can cause problems for your GT later.
- Before installing the GT on a different vehicle, lending it to a friend, or selling the GT (it can only be used on one vehicle at a time).
- If the battery is having problems and could go dead, or if you need to disconnect the battery for any reason.
How to Return to Stock
NOTE: Both methods are very similar to installing the tune, so take the same precautions: choose a good time and place, make sure the battery is charged, pull fuses if necessary, and disconnect aftermarket electronics. As with installing, do not interrupt power while the GT is writing to the engine computer.
Method 1 — Uninstall Download:
- Choose Uninstall Download from the Main Menu.
- Follow the on-screen instructions.
- When the GT confirms the tune has been removed, disconnect it from your vehicle.
- Verify the tune has been removed (see below), then test that your vehicle starts.
Method 2 — Install Download > Return to Stock (if Uninstall Download is not listed):
- Choose Install Download from the Main Menu and follow the on-screen instructions.
- When prompted to choose between "Change Settings" or "Return to Stock," choose Return to Stock.
- Follow the remaining instructions, verify the tune has been removed, then test that your vehicle starts.
How to Check if the GT Is Still Installed
- Main Screen: Look at the lower-right corner. If it reads "Power level setting not available until download is installed," the tune is not installed.
- Show Settings Screen: Main Menu → Show Settings → check the Status. Installed = tune still loaded; Not Installed = returned to stock; Recovery = a problem exists, contact technical support.
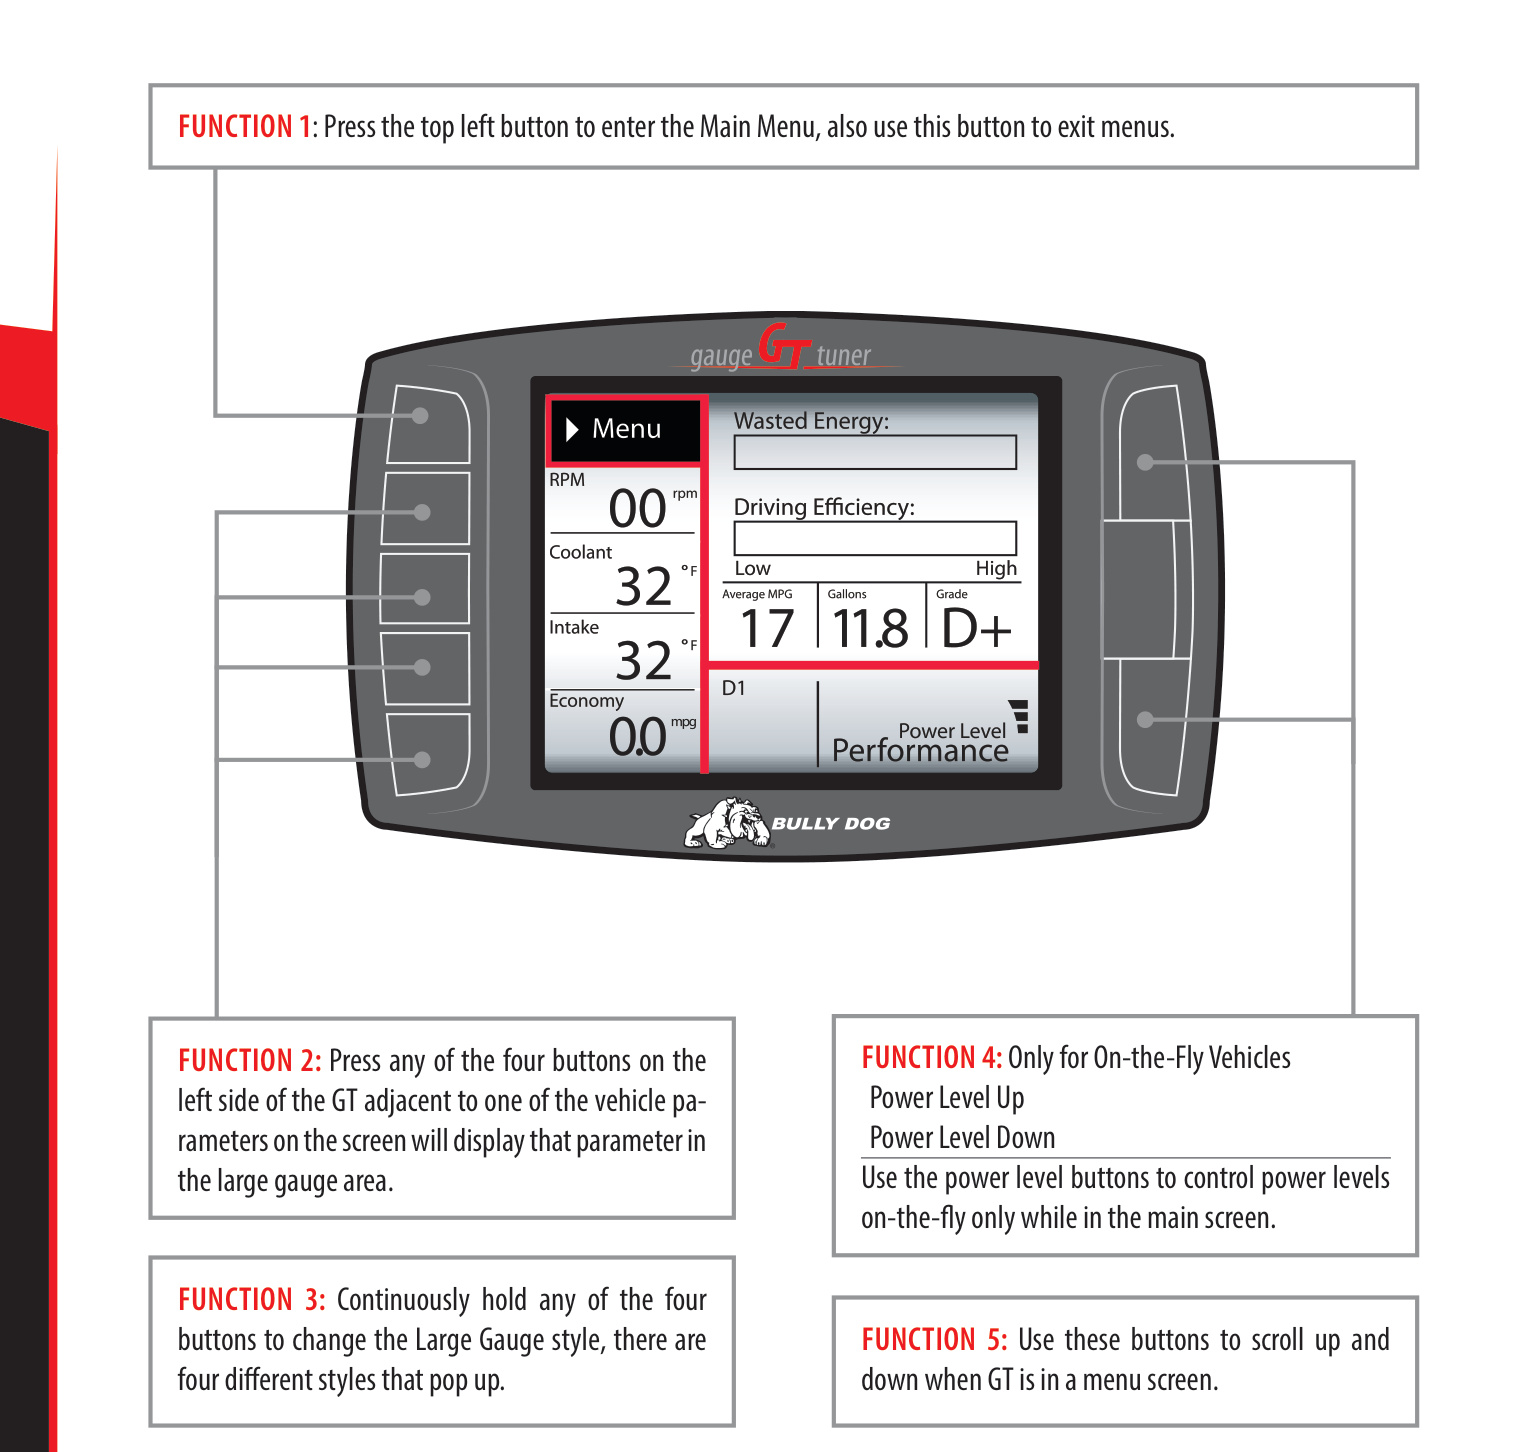
The Main Screen and Button Navigation
The main screen shows your selected vehicle parameters and a large gauge area. You can change which gauge is featured in the upper-right corner by holding down one of the buttons on the left side until the gauge style you want appears.
- Menu button (top left): Press to enter the Main Menu; also used to exit menus.
- Four left-side buttons: Press the button next to a vehicle parameter to display that parameter in the large gauge area. Hold a button to cycle through four large-gauge styles (analog with mini graph, analog with average and max peaks, the Driving Coach, and a large real-time graph).
- Power level buttons (On-the-Fly vehicles only): Use the Up/Down buttons to change power levels on the fly while on the main screen.
- Right-side buttons: Use to scroll up and down within menus.
NOTE: The GT buttons are capacitive touch — a light touch is all that is needed. You do not need to push hard or move the buttons in for the GT to respond.
Gauge Setup
The Gauge Setup option lets you choose which gauges are shown on the main gauge screen.
- Choose Gauge Setup from the Main Menu.
- Press a button on the left side to highlight the gauge slot you want to change.
- Use the buttons on the right side to scroll through the available functions and highlight the one you want.
- When done, use the top-left button to return to the Main Menu and General Display.
NOTE: Not all gauge types are available through every vehicle's OBDII port — this is outside Bully Dog's control. Add-on sensors and a Sensor Docking Station are available to expand what the GT can monitor.
Available Gauges
- Pyro 1 & 2: Exhaust gas temperature (differ only by sensor location). Used for defuel and warning settings. All '07.5 and newer diesels with OEM diesel particulate filters include factory pyrometer sensors; pyrometer kits are available for other vehicles.
- Speed: Current vehicle speed. Other values like odometer and fuel efficiency are based on this; it can be corrected if inaccurate (see Calibrate Speedometer / Adjust Speed Display).
- Boost: Turbo boost pressure.
- RPM: Engine revolutions per minute.
- Coolant: Coolant temperature (used in defuel and warning settings).
- Throttle: Throttle position, as percent open (used by the Driving Coach).
- Intake: Intake air temperature.
- ICP: Injection control pressure.
- Trans Temp: Transmission temperature (used in defuel and warning settings).
- MAF: Mass airflow sensor reading.
- Fuel Econ.: Real-time fuel economy in miles per gallon.
- Fuel Flow: Fuel being used, in gallons per hour.
- A/F Ratio 1 & 2, AUX 1/2/3, AUX Temp, Frequency: Additional readings available only with the Bully Dog Sensor Docking Station (part #40385).
Other Available Options
- Change Vehicle: Choose the vehicle the GT will be used with. Cannot be used once the tune is installed.
- Install Download: Installs the tune to the engine computer, or changes settings that require writing a new tune.
- Performance Testing: Run 1/4 mile and 0–100 KPH tests (Speed-Sensitive or Race Tree styles), view and save results to the SD card, and analyze them with the free Performance Testing Software.
- DPF Burn-Off / Mobile Desoot: Requests the vehicle to start a DPF burn-off (not available on all vehicles).
- Special Functions: Vary by vehicle (see below).
- Diagnostics: Reads and clears Diagnostic Trouble Codes (DTCs) from your engine.
- Driving Coach Setup: Your fuel-economy dashboard, giving real-time feedback to improve efficiency.
- Vehicle Setup: Select pyro source, set defuel levels, and adjust the economy and speed displays.
- User Options: Background theme, backlight, animation, English/metric units, and reset to default.
- Show Settings: Shows vehicle and GT info and whether the tune is currently installed.
- Uninstall Download / Update Firmware: Return to stock, or update the GT software from the SD card.
WARNING: Street racing is illegal and extremely unsafe. The performance testing feature should only be used on a sanctioned 1/4 mile drag racing track.
NOTE: Most DTCs indicate a problem with the engine, not with the tune or tuner. To check whether a DTC is caused by the GT, uninstall the tune and drive for about a week — if the code returns with the tune removed, the problem is with the vehicle.
Driving Coach
The Driving Coach provides real-time visual and audio feedback about driving efficiency and where energy is being lost, helping you maximize fuel economy. It is always running, even when not displayed. Before it can give accurate information, make sure the GT is showing the correct speed.
- Set Economy Goal: Choose a realistic fuel economy goal used to calculate your driving grade.
- Reset Average Economy: Clears stored average economy, gallons used, and grade.
- Adjust Acceleration: Sets the GT's sensitivity to acceleration and deceleration.
- Coach Sound Setup: Turns the Driving Coach sounds on or off.
- Show/Hide: Hold one of the four bottom-left buttons until the display cycles to the Driving Coach style.
Checking Speedometer Accuracy
First, set the Gauge Setup so Speed is shown on the main display. Then find a safe road with a speed limit of at least 60 mph and use one of these methods:
- GPS method: Compare your actual GPS speed to the speed shown on the GT, then calculate the percent difference: (GT speed − GPS speed) ÷ GPS speed.
- Stopwatch method: While traveling at a steady 60 mph (per the GT), record how long it takes to travel exactly one mile using highway mile markers. At a true 60 mph it should take 60 seconds. Calculate: (recorded time − 60) ÷ 60.
To correct the display: in the Adjust Speed Display menu, choose the opposite percentage of the difference you calculated (for example, if the GT was 5% high, choose −5%).
Checking Average Fuel Economy
Check the average economy readout at least once each changing season (fuel energy content varies seasonally). To adjust it:
- Fill the tank, then reset both the GT's Average Economy and your vehicle's trip odometer.
- Drive an entire tank (or two).
- Calculate your actual average fuel economy by hand, then find the percent difference: (GT average economy − calculated economy) ÷ calculated economy.
- Go to Main Menu → Vehicle Setup → Adjust Economy Display, and choose the percentage opposite in sign to your result (for example, if the difference is 14%, choose −14%).
Special Functions (Vehicle Specific)
These features are not available on all vehicles. Check the Product Information Sheet for which features your vehicle supports.
- DPF Burn-Off (2007.5–2012 Chevy/GM 6.6L Duramax only): Requests the vehicle to start the DPF burn-off; follow the on-screen instructions.
- Mobile Desoot (2007.5–2009 Dodge 6.7L Cummins only): Requests the vehicle to start the desoot process; follow the on-screen instructions.
- Auto Door Lock: Locks all doors once the vehicle reaches 15 mph.
- Head Lamp Delay: Sets how long headlamps stay on after shutoff (0–80 seconds, in 5-second increments).
- Fog Lamp: Allows fog lights and high beams to operate together (off-road use only).
- Horn Chirp / Optical Chirp on Lock: Sounds a horn chirp or flashes the hazards when the doors are locked by remote.
- Seat Belt Reminder Chime: Chimes when the vehicle is put in drive and the driver's belt is unbuckled.
- Accessory Delay: Sets how long accessories stay powered after shutoff (0 seconds to 60 minutes).
- Unlock Driver Door: Sets whether the first remote-unlock press unlocks only the driver door or all doors.
- Daytime Headlights: Turns daytime running lights on or off.
NOTE: The DPF Burn-Off / Mobile Desoot functions should only be used if absolutely necessary. If the diesel particulate filter clogs often, there may be an issue with the filter itself that needs to be serviced by an OEM dealer.
Vehicle-Specific Download Features
These are set during the install download and cannot be adjusted On-the-Fly — to change them, restart the install process and choose Change Settings.
- Speed Limiter: Changes the vehicle's top speed before the engine limits power.
- Calibrate Speedometer: Adjusts the factory speedometer reading (useful to correct for a change in tire size). Calibrating for tires over 35″ may turn on the dash ABS light.
- Low End Power: Improves throttle response in the lower RPM range. Available only on Dodge 5.9L Cummins '03–'07 vehicles with automatic transmissions; not recommended for everyday use.
Maintenance & More Information
Pyrometer Calibration
Pyro calibration finds the best temperature for the GT's defueling or warning setting to help prevent heat damage:
- Return your truck to stock (uninstall the tune).
- On a hot day, find a steep hill with a long road and high speed limit.
- Set up a heavy load and haul it to the top of the hill.
- Check the pyrometer temperature and add 150°F.
- Set the defuel (or warning) setting to that new temperature.
Transmission Relearn Process
If you notice rougher shifting on a 6.6L Duramax or 6.0L/6.4L Power Stroke after installing the tune, you can help the transmission adjust. (It will also adjust automatically after about 150 miles of regular driving.)
GM 6.6L Duramax with Allison Transmission:
- At 1/4 throttle, get into 5th gear, then apply light brake pressure until stopped.
- Repeat at 1/2 throttle, then 3/4 throttle, then full throttle.
- Repeat the whole process with the Tow/Haul button on.
Ford 6.0L & 6.4L Power Stroke (TorqShift):
- From a complete stop, put the tuner on its highest setting.
- Moderately accelerate to 55 mph and let it shift into overdrive; hold 55 mph for 15 seconds.
- Lightly apply the brake (just enough to engage the brake lights) and hold 55 mph for another 15 seconds.
- Come to a complete stop for 20 seconds.
- Repeat the cycle five more times, then drive normally.
USB Mode
When you connect the GT to your computer via USB, it enters USB Mode. Keep it in USB Mode to use the Update Agent. To use the computer to power the GT and access its functions while off the vehicle, abort USB Mode by pressing the second key from the top on the left side.
Troubleshooting & FAQs
- Engine stuck in warm-up mode (can't change power level): Go to Main Menu → Vehicle Setup → Set Defuel Levels → scroll to Startup Coolant Temp Level and turn it off.
- GT won't turn off: The power switch on the OBDII adapter plug is in the wrong position. For the GT to power off with the vehicle, set the switch to KEY and confirm the power cable is installed correctly.
- Vehicle won't start after installing the download: Return the truck to stock and test; update the GT; install the download again and test. If the problem persists, contact technical support.
- Vehicle won't start after returning to stock: Confirm all preparation steps are complete, then check Show Settings → Download. If it shows Recovery, go to Main Menu → Install Download, confirm the Recovery, and follow the prompts; once complete, the truck is returned to stock.
- My vehicle isn't listed under Change Vehicle: Chevrolet owners should choose the GMC option matching their year. Very new or very old vehicles may not be supported yet.
- I don't feel extra power: If your vehicle was just at the dealer, you may have forgotten to return it to stock before service flashed the ECM. Check whether it's still installed; if it is and you still feel no change, contact technical support.
- Will the GT delete my DPF? No. Bully Dog does not offer DPF delete.
- PTO option during setup: A power take-off option that lets the engine power external devices — available only on equipped vehicles, so most will only see "No."
Contacting Technical Support
Technical support is open Monday–Friday, 7 a.m.–6 p.m. Mountain Time, at (940) 783-9915. Have the following ready when you call:
- Your GT tuner
- Your vehicle
- A computer with internet access