
Installation instructions for the Flo-Pro 4″ turbo-back exhaust system, part #834NM, for 2007-2008 NBS GM Duramax 2500/3500 6.6L trucks. This single-outlet, mandrel-bent system replaces the restrictive factory exhaust from the turbo back. Intended for race/off-road use only.
Download the Original PDF Manual
WARNING: Before you begin, verify that you received the right kit and that each part listed below is present. This 4″ turbo-back system (Kit #834) is for race / off-road use only.
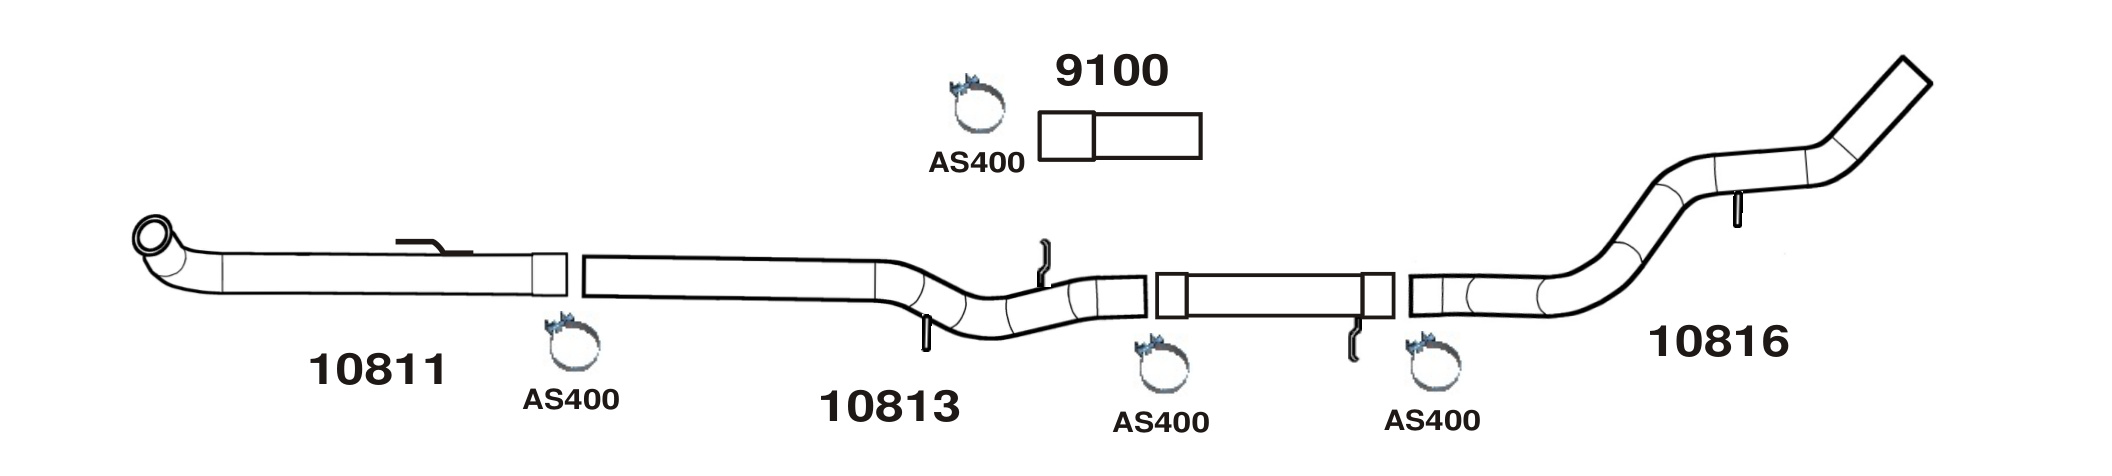
Kit Contents
- 1 × #10811 — downpipe
- 1 × #10813 — muffler-delete pipe (cut to length)
- 1 × #10816 — tailpipe
- 1 × #9100 — extension pipe (used on Crew Cab Long Box & Dually wheelbases)
- 1 × #16299 — pipe
- 4 × AS400 — band clamps
Tools Required
- Flat-head screwdriver
- Sawzall or hacksaw (preferred method for cutting exhaust)
- WD-40 and a penetrating lubricant such as Loosen-All
- Basic hand tools (wrenches/sockets for the clamp bolts)
- MIG welder (optional — recommended for added security at the clamped connections)
Removal of the Original System
- Starting at the turbo, remove the band clamp from the downpipe at the turbo. Loosen the bolt enough to unlatch the clamp, then pry the clamp away from the flange at three spots with a flat-head screwdriver and remove the clamp.
NOTE: Keep the OE band clamp — it will be reused with the new system.
- To make removal of the tailpipe easier, cut it right after the muffler. Spray the hangers with WD-40 and Loosen-All, then pry the hangers from the rubber and remove the factory exhaust.
NOTE: A sawzall or hacksaw is the preferred method of cutting the exhaust.
Installation Instructions
- Install the downpipe using the factory turbo band clamp. Snug the clamp down so it holds the pipe but the pipe can still be moved. Be sure to insert the rod into the hanger.
- Temporarily hang the muffler-delete pipe in the factory rubber hanger. You will need to support the front of the muffler-delete pipe so it is level with the truck frame and hanging straight with the rubber hanger.
- With the muffler-delete pipe supported and level with the truck, measure from the rear of the downpipe to the front of the muffler-delete pipe — this is the cut length for pipe #10813. For Crew Cab Long Box & Dually wheelbases, pipe #9100 will be needed.
NOTE: Be sure to allow approximately 4″ for the tubing connections, and cut from the long end of pipe #10813.
- Install pipe #10813, installing the hangers into the factory rubber hanger. Put the clamp on snug so it holds the pipe but the pipe can still be moved with some effort.
- Slip the inlet of the muffler over the rear of pipe #10813 and place a clamp on the inlet. Snug the clamp down so it holds the muffler but the muffler can still be moved with some effort.
- Install the tailpipe into the outlet of the muffler, using the factory rubber hanger. Place a clamp on the outlet of the muffler. Snug the clamp down so it holds the tailpipe but the tailpipe can still be moved with some effort.
- Check for clearances — brake lines may have to be moved, as well as e-brake cables and the axle vent tube. Also check that the exit of the tailpipe is level with the truck.
- Starting with the downpipe, tighten the turbo band clamp. Then, beginning at the front clamp, work your way to the back connection, tightening as you go.
NOTE: A MIG weld should be applied to the clamped connections of the pipe for added security. DO NOT WELD THE CLAMPS.
Applications
- 2007–2008 NBS (New Body Style) GM Duramax 2500/3500, 6.6L diesel
- 4″ single-outlet turbo-back system
- Crew Cab Long Box & Dually wheelbases require extension pipe #9100