
Installation instructions for the Flo-Pro 4″ turbo-back muffler-delete exhaust system, part #838, for 2008-2009 Ford F250/F350 6.4L Powerstroke trucks. This single-outlet, mandrel-bent system frees up flow from the turbo back. Designed for race/off-road use only.
Download the Original PDF Manual
WARNING: This system is designed for race use only and may void the manufacturer’s warranty. Before you begin, verify that you received the right kit and each part listed below. Allow the truck’s exhaust system to cool completely before removal, and always practice safe work habits — use jack stands, gloves, safety glasses, etc.
Application
- 2008-2009 Ford F250 / F350 Powerstroke 6.4L
- 4″ Turbo Back Single System — Muffler Delete
Kit Contents
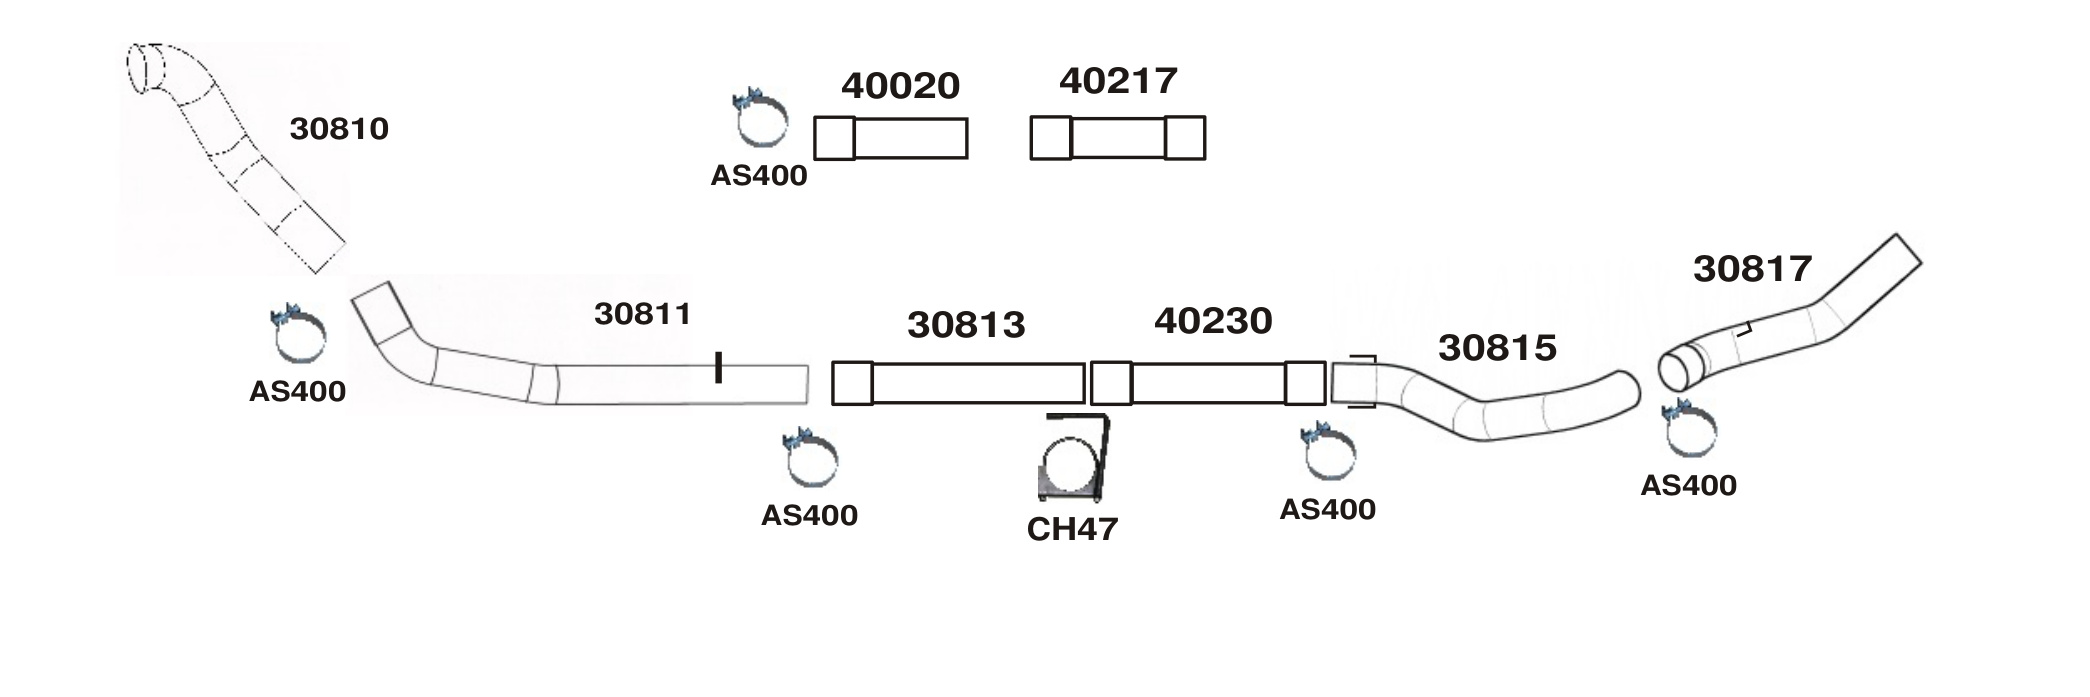
- 1 × 30810 — downpipe
- 1 × 30811 — intermediate pipe
- 1 × 30813 — pipe (install with the pre-welded bracket pointing upward)
- 1 × 40230 — muffler-delete pipe
- 1 × 30815 — over-the-axle pipe
- 1 × 30817 — tailpipe
- 1 × 40020 — extension pipe
- 1 × 40217 — extension pipe
- 5 × AS400 — band clamps
- 1 × CH47 — clamp hanger
- 1 × 3/8 × 1 1/4″ FT bolt
- 1 × 3/8 flanged nut
Tools & Supplies Recommended
- Jack stands, gloves and safety glasses
- Flat-head screwdriver (to release the turbo band clamp)
- Sawzall / reciprocating saw (to cut the OEM downpipe)
- WD-40 or equivalent penetrant (to ease removal of hangers)
- MIG welder (a small tack on all clamp connections is recommended)
Before You Begin — Important Notes
NOTE: Flo-Pro performance exhaust systems are designed to fit stock trucks with OEM hitches, tires, wheels and spare sizes. Any suspension lifts or other variations may require modification of the new exhaust system for proper fit and finish.
- Place clamps on the connections before installing the pipes. Do not tighten the clamps until the complete system is in place. Snug each clamp just enough to hold the pipe while still allowing it to be moved.
- WD-40 or an equivalent will make removal of the hangers easier.
- A small tack with a MIG welder is recommended on all clamp connections.
Installation
Removing the OEM Exhaust System
- Starting at the turbo, remove the band clamp from the downpipe at the turbo. Loosen the bolt enough to unlatch the clamp, then pry the clamp away from the flange at three spots with a flat-head screwdriver and remove the clamp.
NOTE: Keep the stock band clamp — it will be reused with the new system. You will need to cut the downpipe with a Sawzall to remove it from the truck.
- At the flanged end of the downpipe, unbolt the flange connection and all clamps from the rear of the particulate filter to the tailpipe. Remove the metal hangers from the OE rubber hangers and detach the line/sensors from the particulate filter. Remove the OE system from the truck.
NOTE: Removal of the tailpipe section is easier with the rear wheels hanging freely, if cutting the tailpipe is not wanted.
Installing the New Flo-Pro System
- Connect the downpipe and intermediate pipe together before placing and clamping the downpipe to the turbo. Install the 30813 pipe with the pre-welded bracket pointing upward. Place the supplied clamp hanger (CH47) into the OE rubber hanger. Install the extension pipes and muffler-delete pipes depending on wheelbase. Reinstall the line/sensors from the diesel particulate filter back onto the new system.
- Install the over-the-axle pipe and tailpipe, placing the metal hangers into the OE rubber hangers.
- With the pipes mounted loosely, adjust the new Flo-Pro system for clearance and appearance. Then evenly tighten all clamps, starting with the front flange connection and working your way to the back.